Configure Turnstile
Use test keys for the initial deployment, then create a Turnstile widget for your production domain, replace the keys, and verify the bot protection flow.
Turnstile blocks bot submissions and malicious attempts. Some Saavo template features rely heavily on Turnstile. The template already connects the browser widget and server-side Siteverify verification by default, so you do not need to copy Cloudflare's example code.
For the initial deployment, you can keep Cloudflare's official test keys while deploying the Worker and other resources. Once you have chosen a production domain, create a widget and replace them with real keys. This lets you complete the first deployment before choosing a domain.
Test keys are only for temporary verification
Cloudflare test keys work on any hostname but do not provide real bot detection. You can deploy with them to workers.dev, but you must replace them with keys generated by a production widget before opening registration, sign-in, or support forms to users.
When to configure Turnstile
Saavo CLI does not ask for Turnstile keys when you create a project with:
npx saavo-cli@latest create my-projectAfter project creation, the local .env retains the test keys. When you are ready for the initial Cloudflare deployment, run:
npx wrangler login
npm run deploy:init
deploy:init handles Cloudflare account selection, Worker and resource naming, production environment variable collection, and the initial deployment. Unless Turnstile is disabled in config/deploy.ts, the interactive process asks for:
Cloudflare Turnstile site key:
Cloudflare Turnstile secret key:
Neither value can be empty, but the deployment script does not distinguish test keys from real keys. If you only have a workers.dev address for now, enter the official test pair from example.vars. If you have chosen a production domain and created a widget, enter the real keys instead. Both values are written to .env.production. The local .env is unchanged.
Prepare a hostname before launch
Cloudflare requires at least one allowed hostname when you create a widget. This is usually the production domain your product will use, such as:
example.comEnter only the hostname, without a protocol, port, or path. These entries are all incorrect:
https://example.com
example.com:443
example.com/login
*.example.com
Under Cloudflare's current rules, adding example.com also allows all of its subdomains to use the widget. Adding only app.example.com does not automatically include example.com or sibling subdomains. See Hostname management for the full rules.
Saavo initially deploys to a workers.dev address. If you only want to verify the deployment process, use the official test keys. You do not need to create a production widget for this temporary address. When you are ready to connect a custom domain, add your production domain to Hostname Management and generate real keys.
If you intend to serve users from a workers.dev address long-term, you should also configure a production widget for the actual hostname rather than keep using test keys. Cloudflare's official documentation does not state that all workers.dev addresses are ineligible for widgets. Whether an address can be added depends on the Dashboard's validation at the time.

Create a widget
- Sign in to the Cloudflare Dashboard and switch to the account where Saavo is deployed.
- Open Application security → Turnstile in the sidebar.
- Click Add widget manually in the upper-right corner.
- Enter a recognizable Widget name, such as
saavo-production. - Add your production domain under Hostname Management.
- Select Managed under Widget Mode.
- Keep the default Pre-clearance setting and click Create.
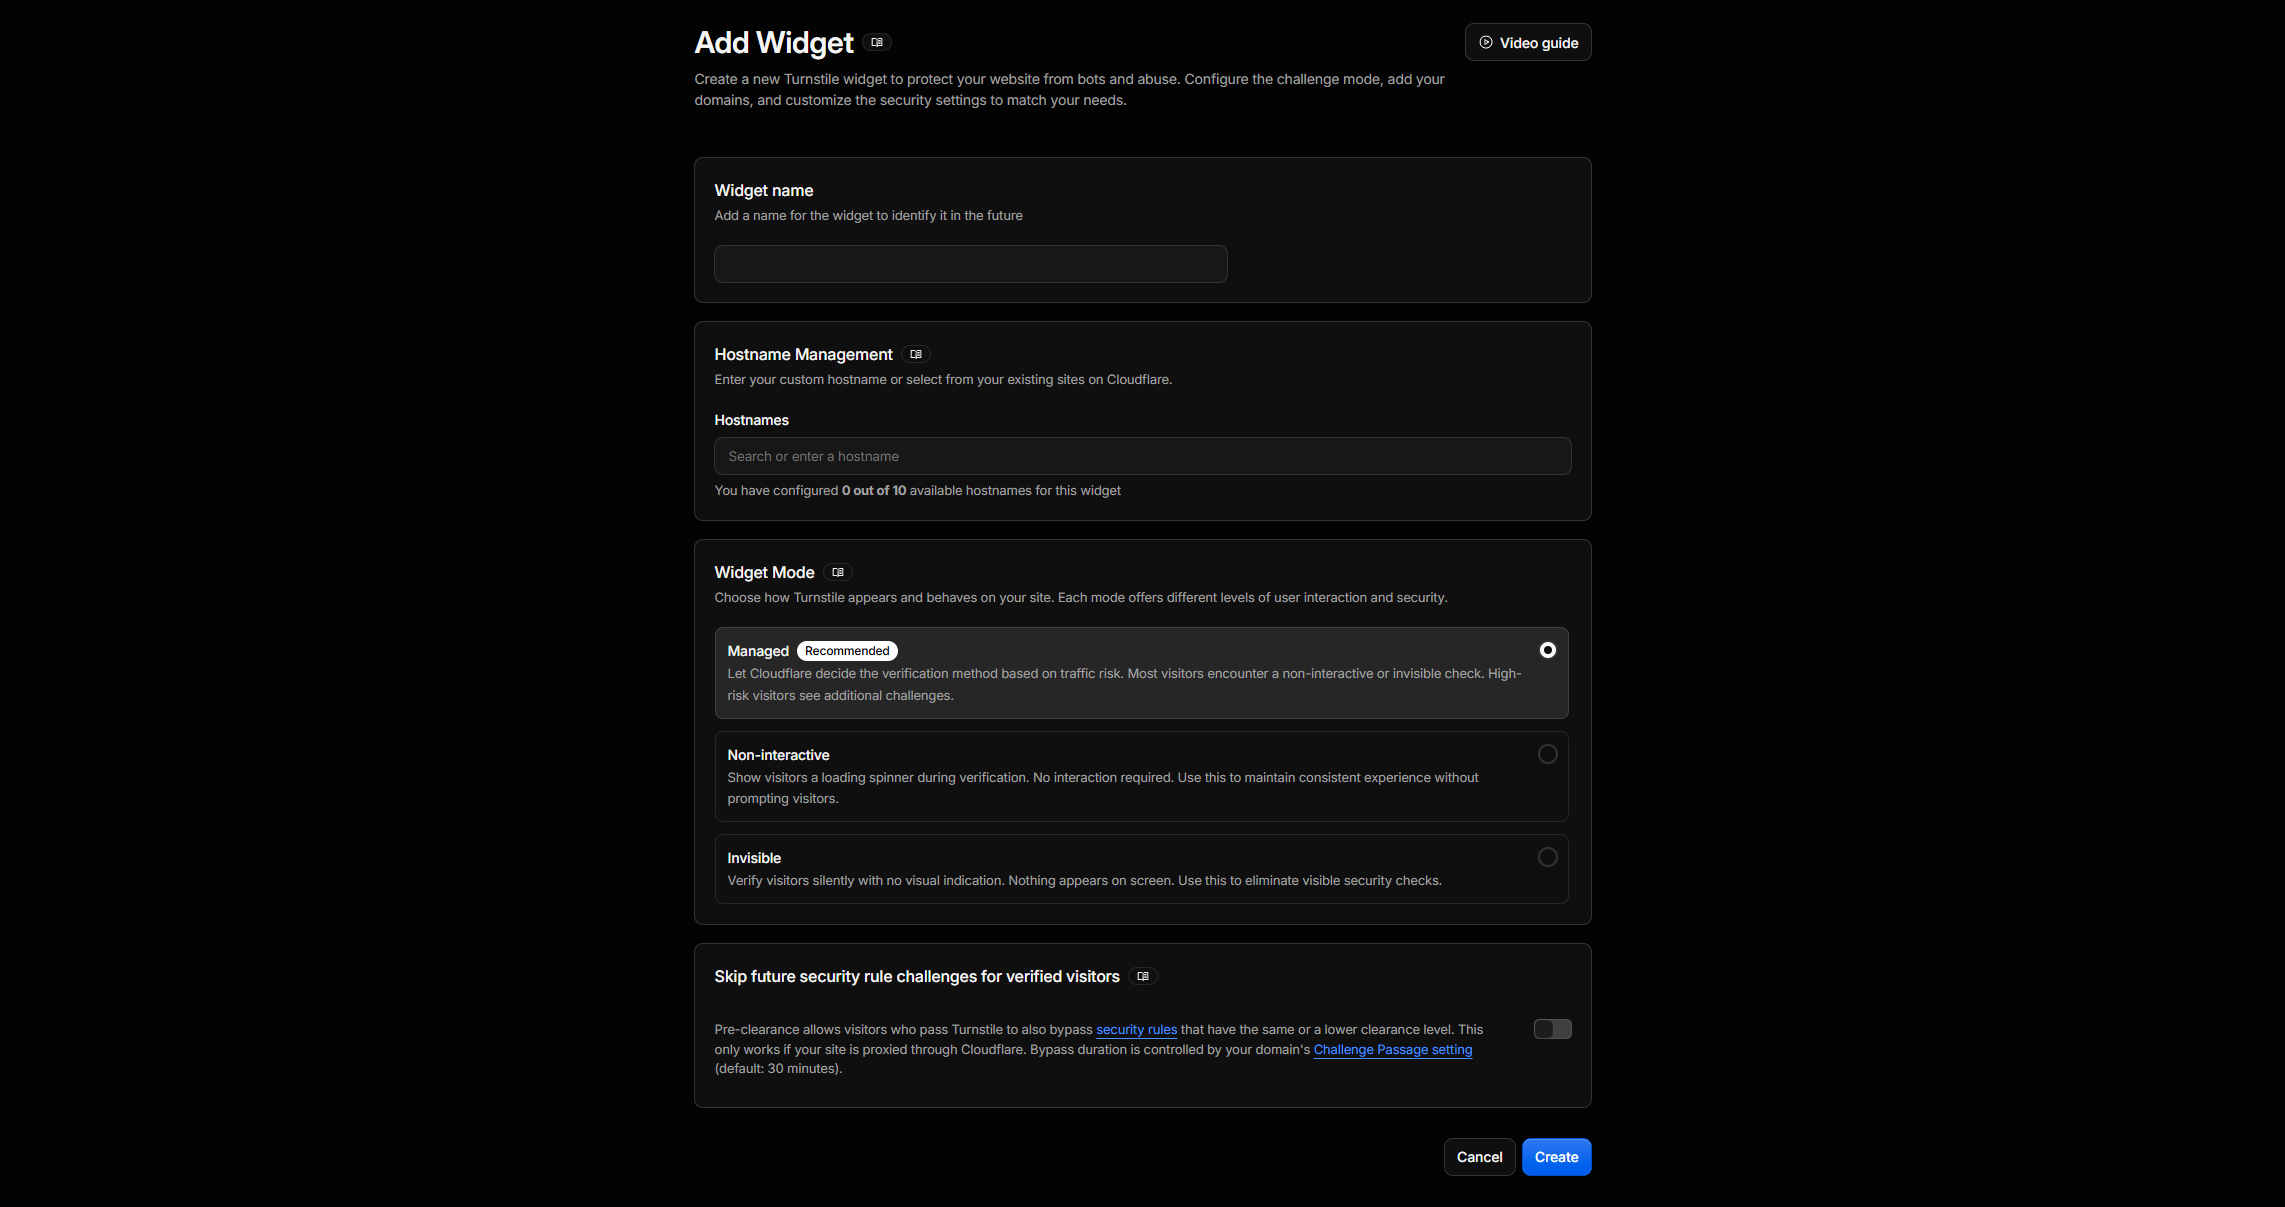
Managed is Cloudflare's recommended default mode. It determines whether interaction is needed based on visitor risk. Legitimate users usually do not need to take any extra action.
You can ignore Pre-clearance, the final option on the form, for now. Saavo does not depend on the cf_clearance cookie it generates, so you do not need to enable it unless you are also configuring a WAF Challenge.
For Cloudflare's latest Dashboard instructions, see Create and manage widgets. UI labels may change, but the core information remains the name, hostname, and widget mode.
Save both keys
After creating the widget, the page displays two values:
| Cloudflare field | Saavo environment variable | Can it be public? |
|---|---|---|
| Site Key | CLOUDFLARE_TURNSTILE_SITE_KEY | Yes. It is sent to the browser. |
| Secret Key | CLOUDFLARE_TURNSTILE_SECRET_KEY | No. It must remain on the server. |
Save them in a password manager or your team's secret management tool. Do not post the Secret Key in group chats, put it in config/deploy.ts, or commit it to Git.
Site Key and Secret Key must be a matching pair
Pair a test Site Key with a test Secret Key, and a production Site Key with the production Secret Key generated by the same widget. If you mix them, the widget may still appear, but server-side verification will always fail.
Keep the local test keys
The .env copied from example.vars already contains test keys. Leave them unchanged:
CLOUDFLARE_TURNSTILE_SITE_KEY="3x00000000000000000000FF"
CLOUDFLARE_TURNSTILE_SECRET_KEY="1x0000000000000000000000000000000AA"
These are Cloudflare's publicly available test keys, not placeholders to replace. The current Site Key forces an interactive challenge so you can check the UI. The Secret Key allows the corresponding test token to pass server-side verification.
Test keys work on any development domain. Production keys check the hostnames allowed by the widget. Cloudflare also explicitly recommends keeping localhost and 127.0.0.1 out of production widgets. See Test your Turnstile implementation for testing rules and other test key pairs.
Configure remote deployment
You do not need to run wrangler secret put yourself. The first time you run npm run deploy:init, enter a matching Site Key and Secret Key when prompted. Without a production domain, you can use the test pair shown earlier. If you have already created a widget, enter its real keys. The command first lists the remote environment variables it will write:
Production environment changes:
- set CLOUDFLARE_TURNSTILE_SITE_KEY
- set CLOUDFLARE_TURNSTILE_SECRET_KEY
After you confirm Write these production environment changes?, both values are written to .env.production in the project root. If the file does not exist, the deployment script creates it using example.vars as the field list. If it exists, previously entered values are retained. The script only checks that neither value is empty. It does not stop deployment because the keys are Cloudflare test keys.
The resulting file should contain:
CLOUDFLARE_TURNSTILE_SITE_KEY="Your test or production Site Key"
CLOUDFLARE_TURNSTILE_SECRET_KEY="The Secret Key paired with your Site Key"
.env.production is the only production environment variable file read by Saavo's deployment process, and it is already excluded by .gitignore. During deployment, the script passes the Site Key to Wrangler as a public Worker variable and the Secret Key as an encrypted secret. The temporary secrets file used in the process is deleted when the command ends.
Each environment file has a separate purpose
.env serves local development and can keep test keys indefinitely. .env.production serves remote deployment. It can temporarily hold test keys for the first deployment, but they must be replaced with real keys before launch. Do not copy the real Secret Key into the local environment or commit either file.
If you exit or do not save
If you exit before confirming the write to .env.production, the values you entered are not saved. The next step depends on whether the project has completed its initial deployment:
- Initial deployment is not complete: Rerun
npm run deploy:initand enter the matching pair again. - Initial deployment is complete: Edit the two values in
.env.production, then runnpm run deploy:update. - You want to prepare before deployment: Create or edit
.env.productionmanually, enter both keys, then runnpm run deploy:init. If you create the file manually, also make sure itsSAAS_SECRETexactly matches the local.env.
Do not change remote values only in the Cloudflare dashboard or through wrangler secret put. Subsequent npm run deploy:update runs still use .env.production as the source of truth. Changing only the remote environment leaves the project's recorded configuration out of sync with the deployment.
After making your changes, run npm run deploy:init if the project has not yet had its initial deployment, or npm run deploy:update if it has already been initialized. Both commands check configuration and synchronize Wrangler secrets before deploying, but they only check whether keys are present, not whether they are test keys.
Replace test keys when switching to a custom domain
Once you have chosen your production domain:
- Create a Turnstile widget in Cloudflare and add the production domain to Hostname Management.
- Write the widget's Site Key and Secret Key to
.env.production. - If the custom domain is not bound yet, run
npm run domain:set -- https://app.example.com. This command redeploys with the new keys as well. - If the domain is already bound, run
npm run deploy:update.
After deployment, submit a registration or sign-in form on the production domain. Confirm that server-side verification succeeds before opening the site to real users.
Understand the template's verification policy
By default, Saavo does not show a challenge on every sign-in or registration. The configuration in config/deploy.ts is:
auth: {
    useTurnstile: {
        threshold: 2,
        interval: '1h',
    },
},
The template tracks risk scores by authentication entry point. Once a score reaches threshold, the next request requires Turnstile. Successful verification lowers the risk, and a period of inactivity also resets it. This reduces how often verification interrupts legitimate users at sign-in.
To always require verification on authentication pages while debugging, you can temporarily use:
useTurnstile: {
    threshold: 0,
    interval: '1h',
},
Restore the default after testing. Setting this to false only disables Turnstile on registration and sign-in pages. It is not a project-wide switch. Forms that explicitly require bot verification, such as support tickets, may continue to use Turnstile.
Common issues
The challenge never appears
On sign-in or registration pages, first check the default adaptive threshold. It is normal for the challenge to remain hidden while the risk score is below threshold. This does not mean the Site Key is inactive. You can temporarily set the threshold to 0 while debugging.
It works locally but does not load on the production domain
Open the widget's Settings → Hostname Management and check that the actual hostname in the browser's address bar is allowed. Enter only the domain, without a protocol, port, or path. Save the settings after changing the hostname.
The widget appears, but verification fails after submission
Usually, the Site Key and Secret Key belong to different widgets, or test and production keys have been mixed. Check both variables in .env.production again, then run npm run deploy:update.
Occasional timeout-or-duplicate errors
The token is more than five minutes old or has been submitted twice. Refresh the challenge and resubmit. Do not cache or reuse an old token.
Environment variable changes have no effect
Local testing reads .env, so restart npm run dev after changes. Remote deployment reads .env.production, so run npm run deploy:update after changes. Editing the wrong file does not synchronize it to the other environment.
After these checks, Turnstile is connected. When changing domains later, update the widget's Hostname Management before switching site traffic.