Configure domains
Register a domain with Cloudflare or connect one purchased from Spaceship or another registrar, then configure your website, email, and an R2 custom domain.
For Saavo's initial deployment, you can use the workers.dev address provided by Cloudflare. It is safer to configure your own domain after confirming that the project is accessible. This lets you troubleshoot deployment and domain issues separately without repeatedly changing DNS before the project works.
This page uses webpagetopdf.dev to set up the following addresses in order:
| Purpose | Example | Required? |
|---|---|---|
| Primary website domain | webpagetopdf.dev | Recommended for launch |
| Alternate website domain | www.webpagetopdf.dev | Optional, usually redirects to the primary domain |
| Receiving user email | support@webpagetopdf.dev | Configure if you provide customer support or your website needs a support email address |
| Sending system email | send@mail.webpagetopdf.dev | Needed for registration verification, password recovery, and similar features |
| R2 file domain | files.webpagetopdf.dev | Configure when you need to expose R2 files directly to the public |
You do not need to activate all these addresses at once. You can launch after configuring the website domain, then set up email and R2 as your product needs them.
Understand registrars and DNS
A domain registrar handles purchases, renewals, and ownership information. A DNS service directs the domain to your website, email, and storage services. The same company can provide both, or you can use separate providers.
| Where you buy | Where you renew | Where DNS is managed | Best suited for |
|---|---|---|---|
| Cloudflare | Cloudflare | Cloudflare | The fewest setup steps when you plan to use Cloudflare long-term |
| Spaceship or another registrar | The original registrar | Cloudflare after connection | A better price, domain extension, or payment method at another registrar |
Changing nameservers at Spaceship gives Cloudflare control of DNS. It does not transfer the domain to Cloudflare Registrar. You still renew it at Spaceship and manage registrant information and automatic renewal there.
Keep Cloudflare resources in one account where possible
The domain zone, Saavo Worker, and R2 bucket should belong to the same Cloudflare account. A Cloudflare user can belong to multiple accounts. Check the current account name and Account ID before proceeding so you do not connect the domain to one account while deploying the project to another.
Buy a domain from Cloudflare
If you plan to use Cloudflare long-term, registering directly through Cloudflare Registrar is the simplest option. The domain automatically uses Cloudflare DNS after purchase, so there is no need to change nameservers.
Before purchasing, prepare:
- A Cloudflare login with a verified email address.
- A contact email address you can keep using long-term.
- An accurate registrant name, address, and phone number.
- A payment method that can complete the purchase and support future automatic renewals.
Do not use an email address on the domain you are buying, such as admin@webpagetopdf.dev, as the registrant address. It cannot receive email yet, so you are likely to miss notices if the registry requires verification or a renewal fails. An existing address you can control long-term is more reliable.
Check more than the first-year price
Cloudflare's search results show both first-year and renewal prices. Promotions affect only the first year, and renewals usually return to the regular price. Domains marked Premium may also cost substantially more. Confirm the spelling, renewal price, and registration term before paying. Domain registrations are usually nonrefundable once complete.
Search for and select a domain
Sign in to the Cloudflare Dashboard, switch to the account where you plan to deploy Saavo, and open Domain Registration → Register Domains.
Enter a full domain such as webpagetopdf.dev, or enter your product name to have Cloudflare suggest different extensions. Once you find a domain to buy, check its spelling, first-year price, and renewal price before selecting its purchase option.
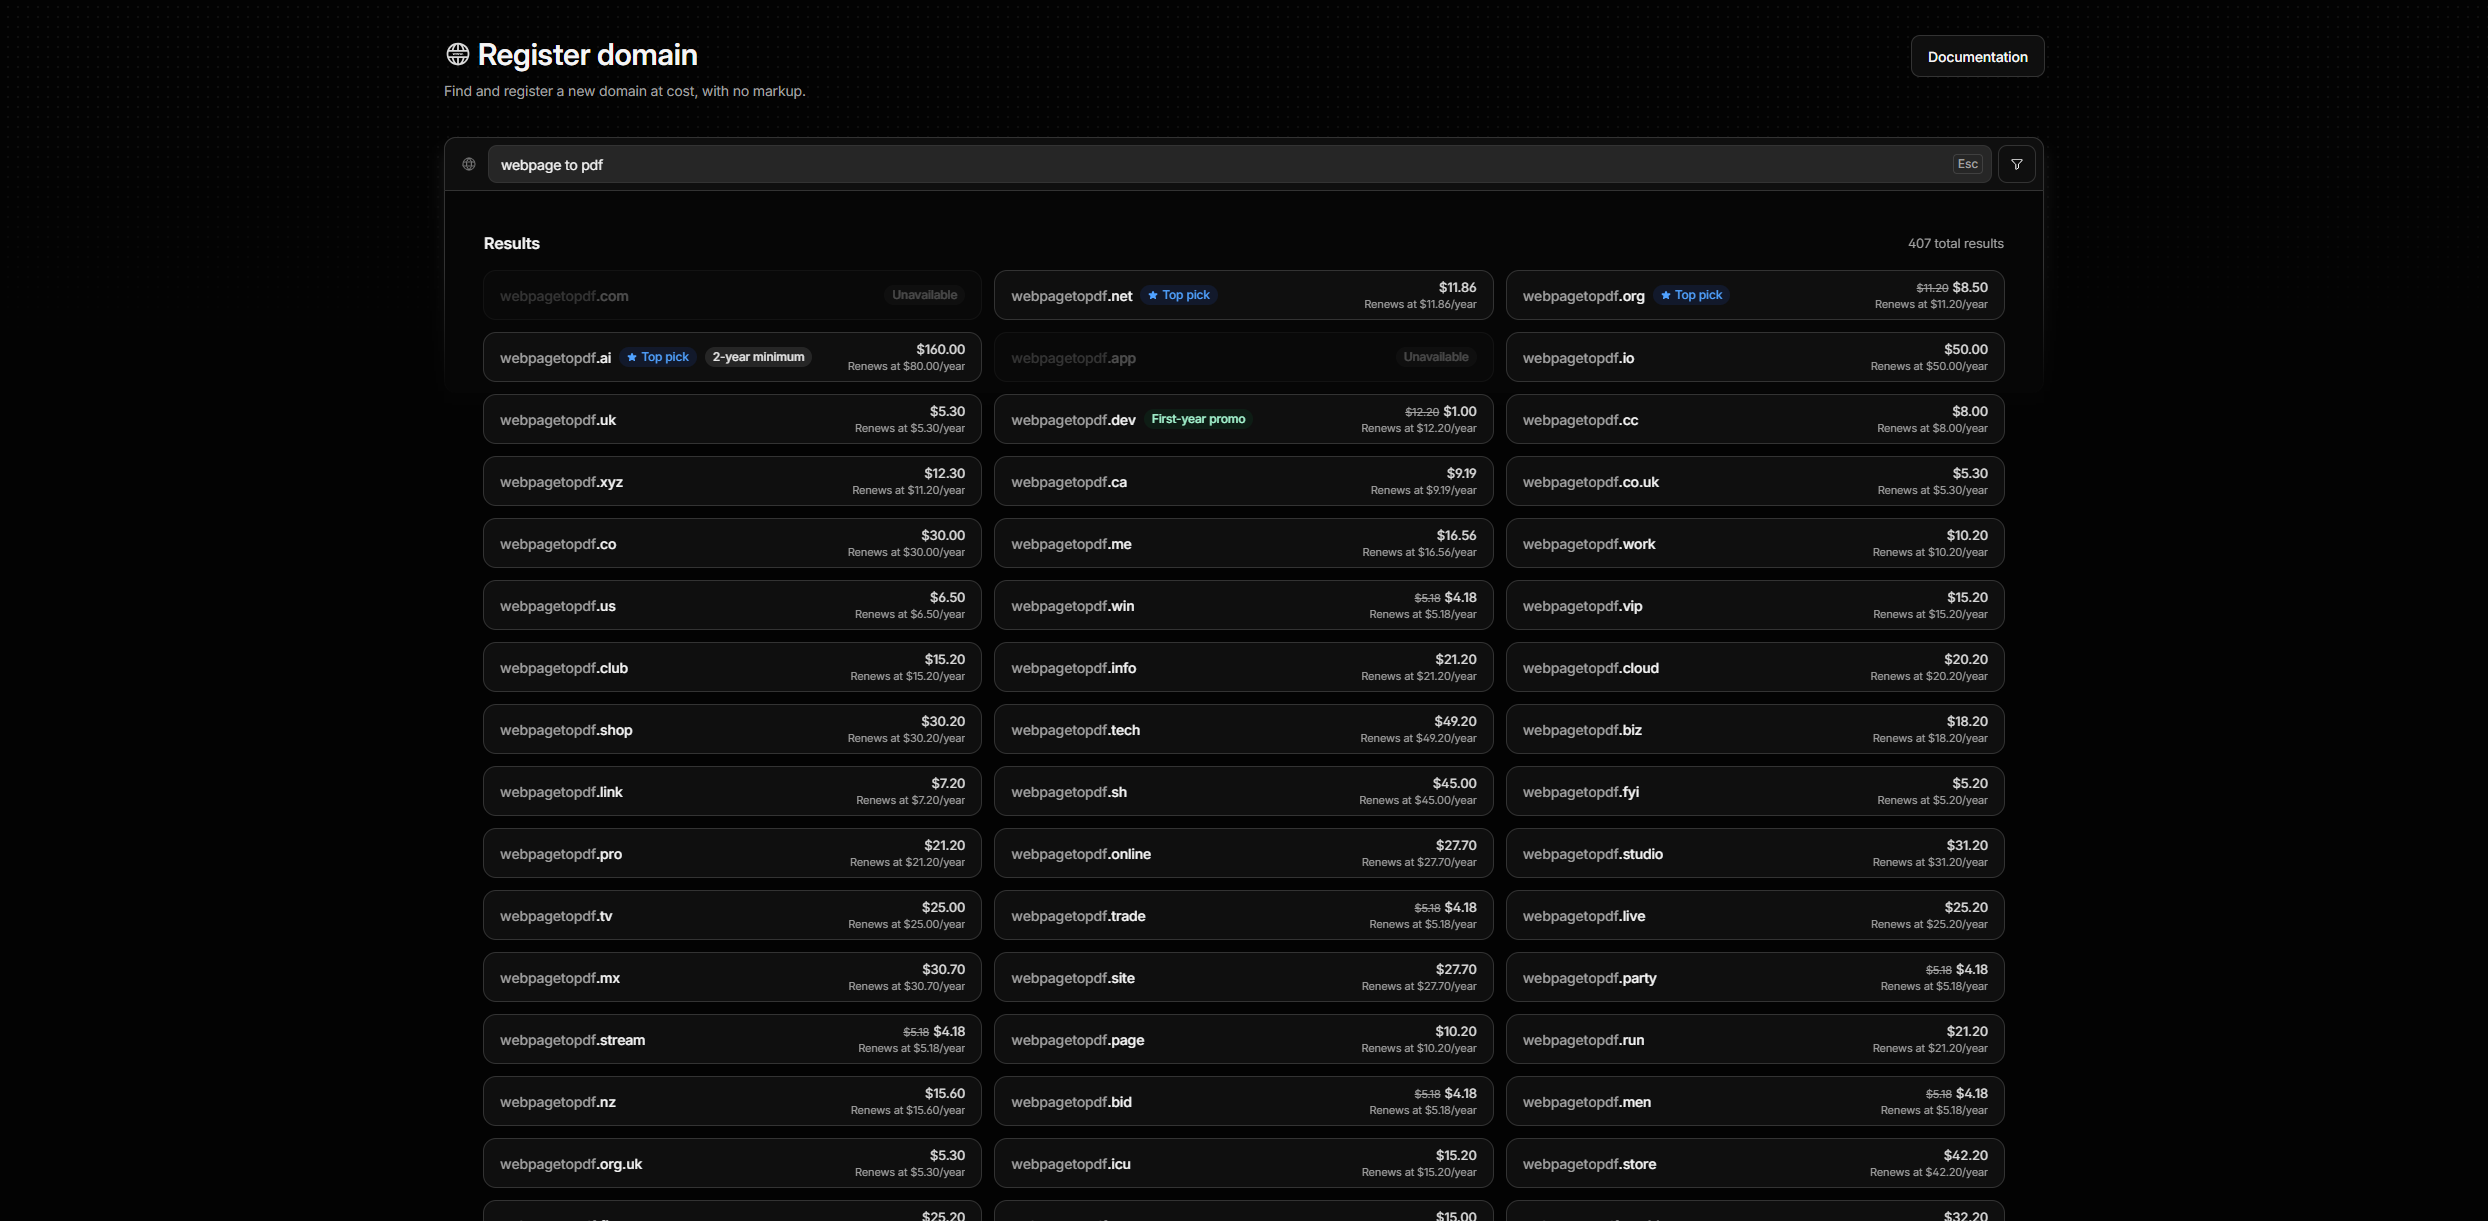
Search results only indicate that the domain appears available at that moment. Cloudflare performs a final check with the registry during purchase. If it then reports that the domain is unavailable, return to the search page and choose another.
Enter registration details
On Complete your registration, choose the registration term and check automatic renewal. Cloudflare enables automatic renewal by default. The right side shows the payment amount, expiration date, and estimated renewal price.
Enter accurate, complete registrant information. Cloudflare currently accepts only ASCII characters, so do not enter Chinese characters in names or addresses. Use pinyin or English that reflects the actual information. The email address must remain accessible long-term, and the phone number must use the correct country or region code.
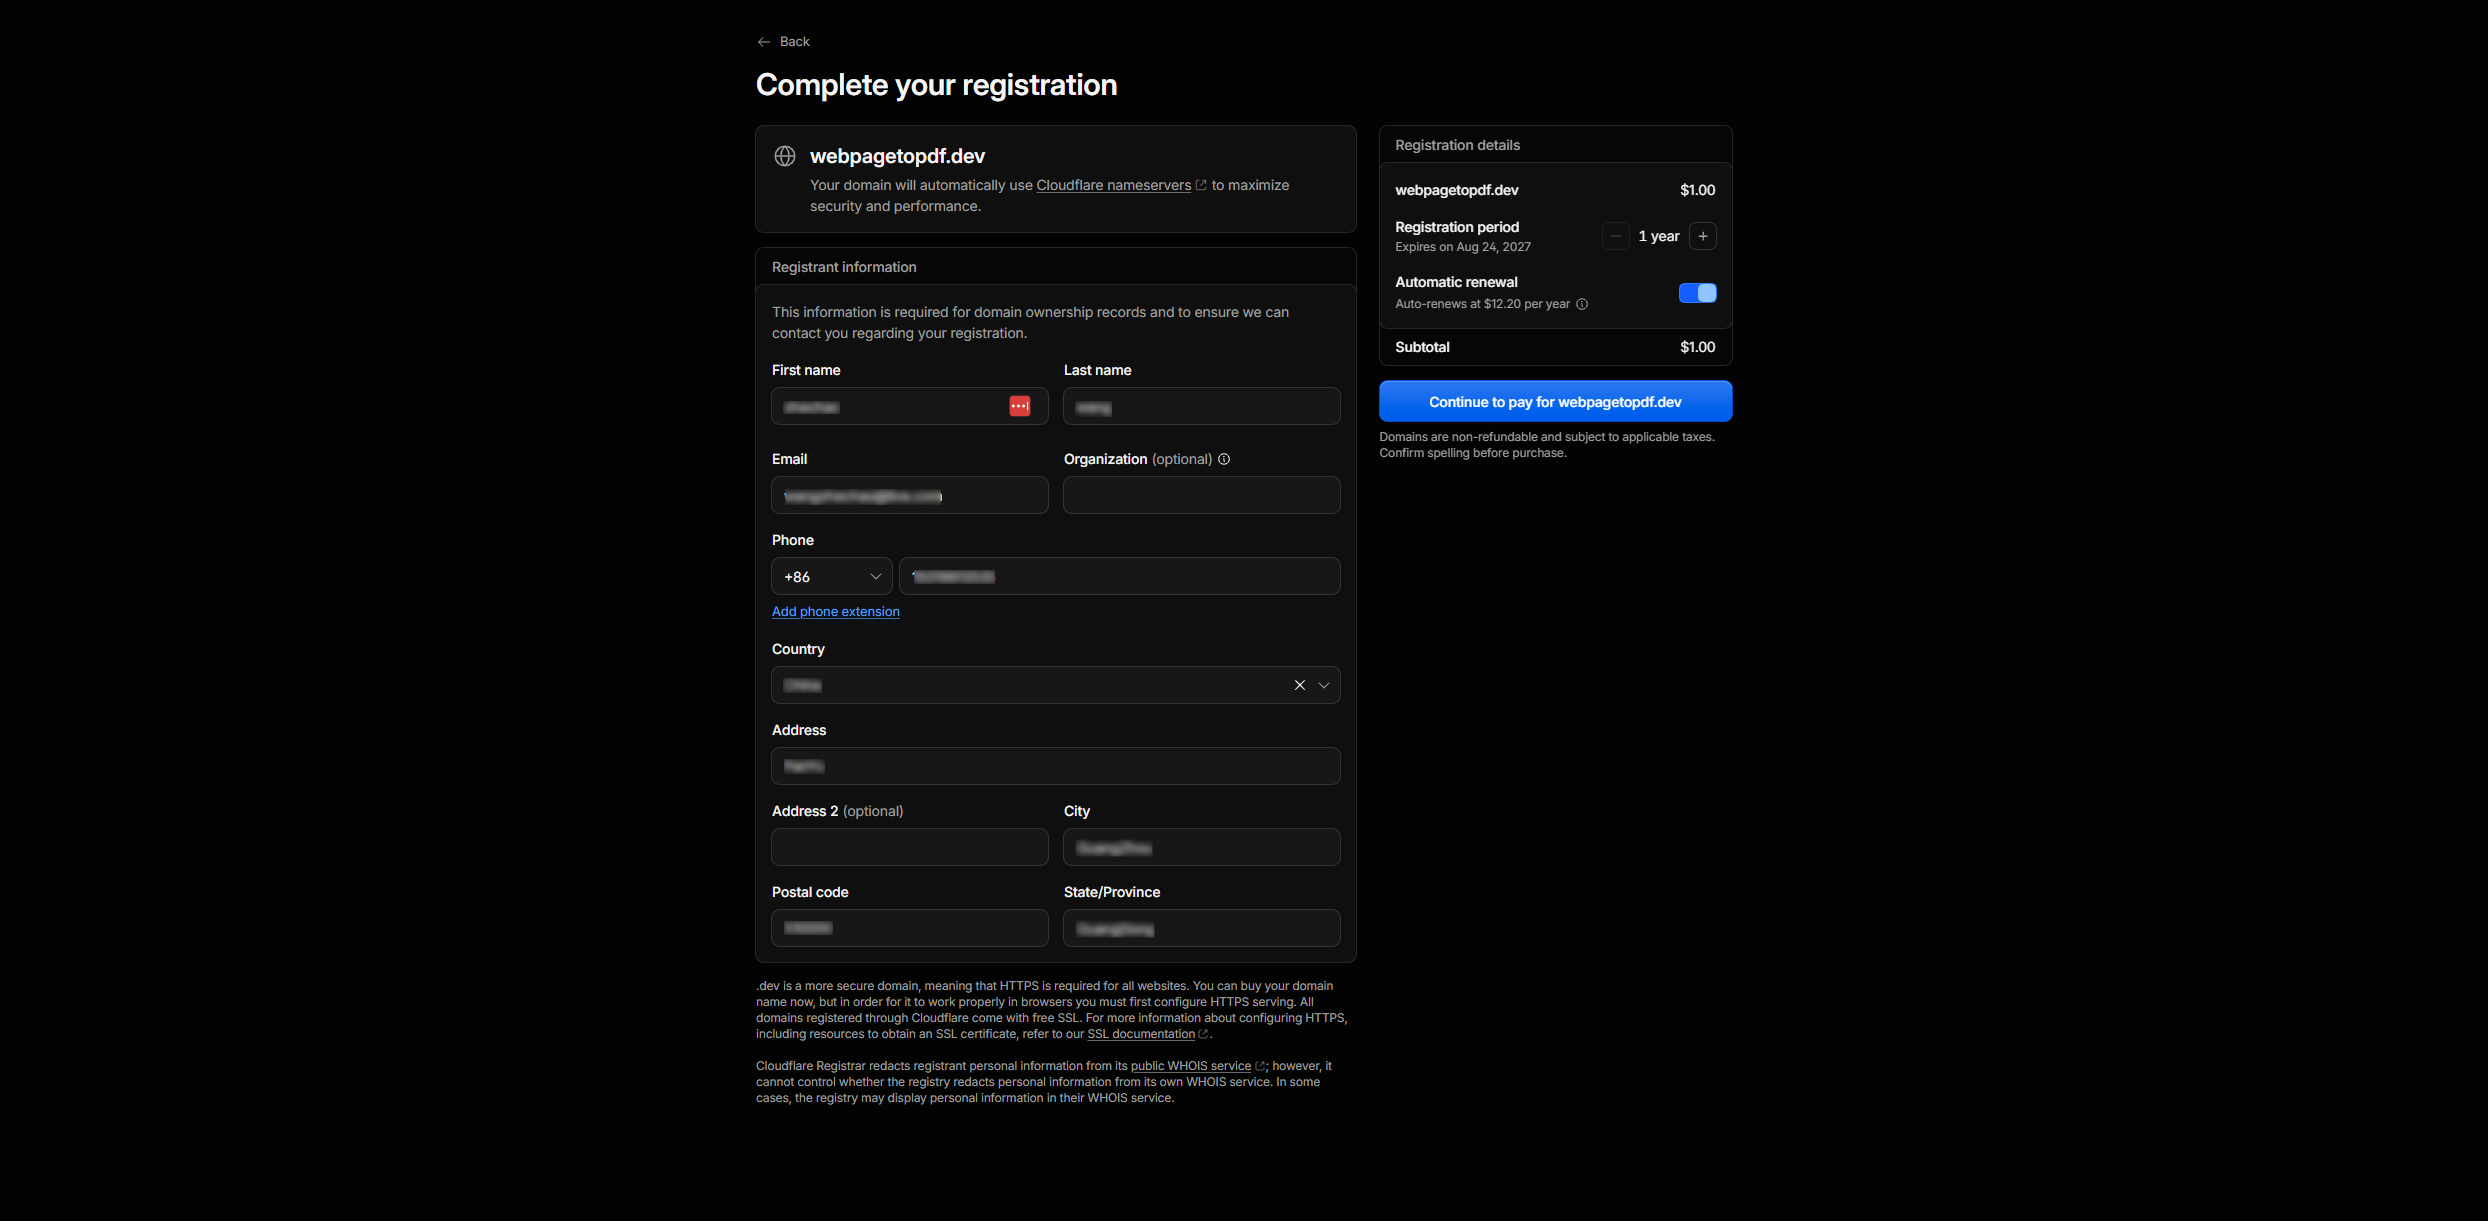
Once the details are complete, click Continue to pay for… on the right to open the order confirmation page.
Review the order and pay
On Register domain, recheck the domain, registration term, amount due, and payment method. Read the domain registration agreement, Terms of Service, and Privacy Policy. After checking them, select the required checkboxes and click Complete purchase.
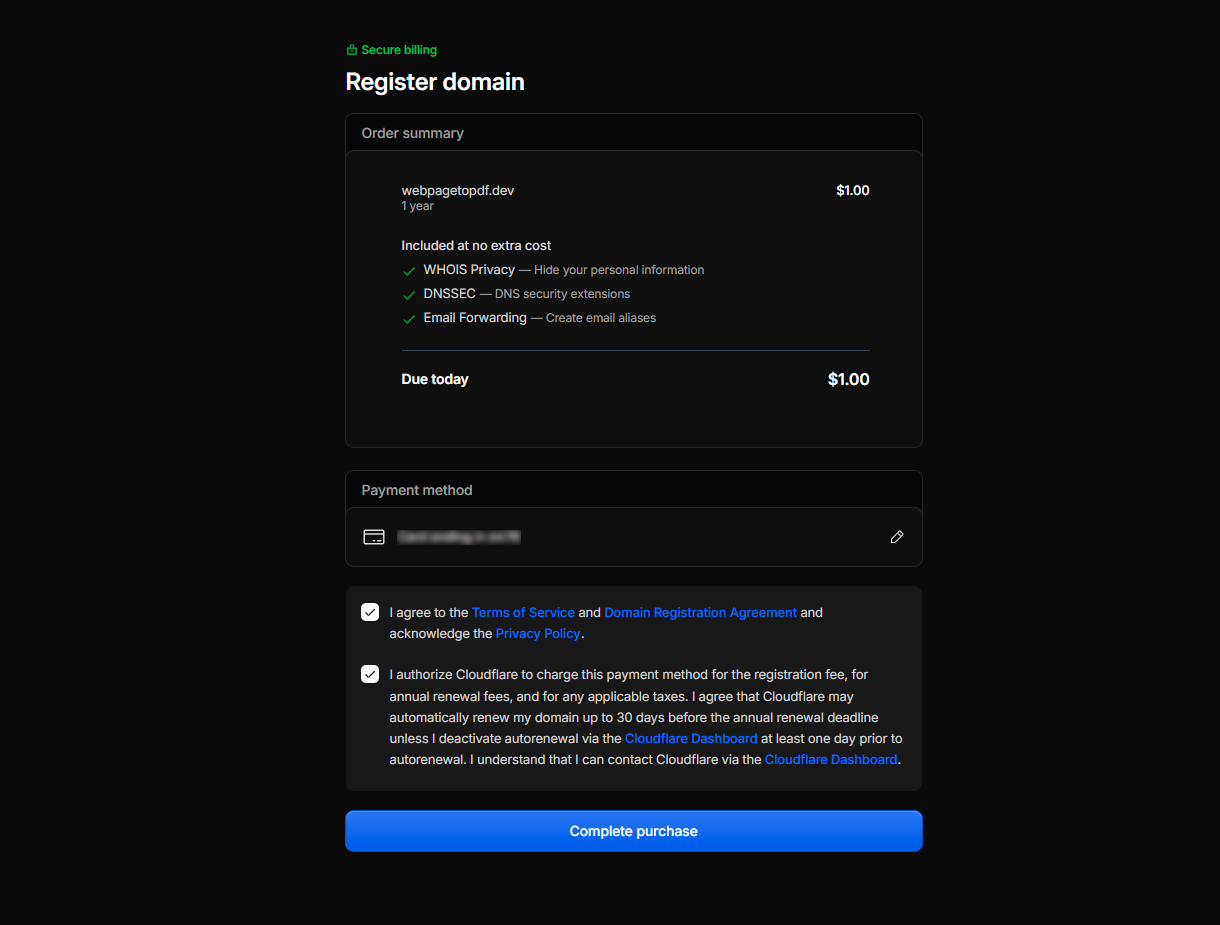
Do not submit the order simply because the browser has saved your payment method. A misspelled domain, wrong extension, or overlooked renewal price usually cannot be resolved with a refund after purchase.
Wait for registration
Cloudflare usually completes registration in a few dozen seconds. When the page shows Your domain is on its way with a success indicator before the domain name, the domain has been registered to the current account.
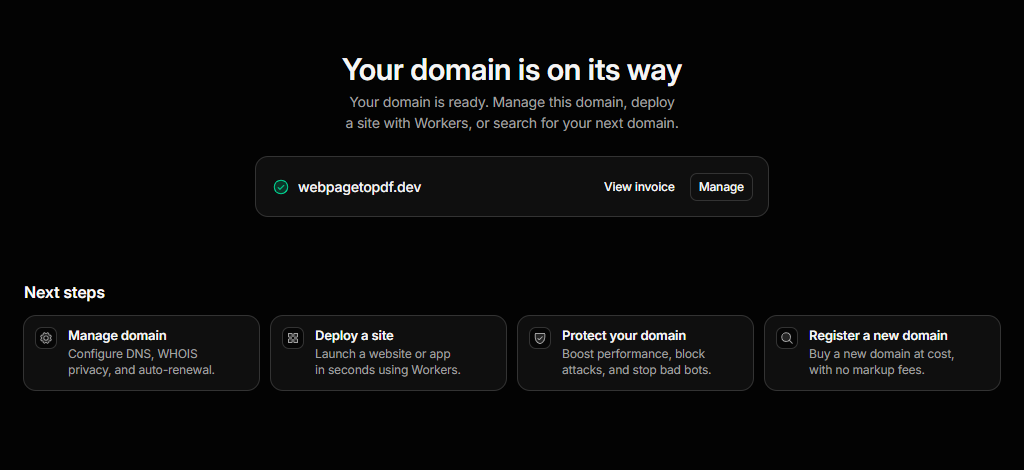
Click Manage to the right of the domain to open its management page. You can also find it later under Domain Registration → Manage Domains.
Check domain status
On the domain management page, confirm that the status is Active and check that the expiration date, renewal price, and Auto renew setting are correct.
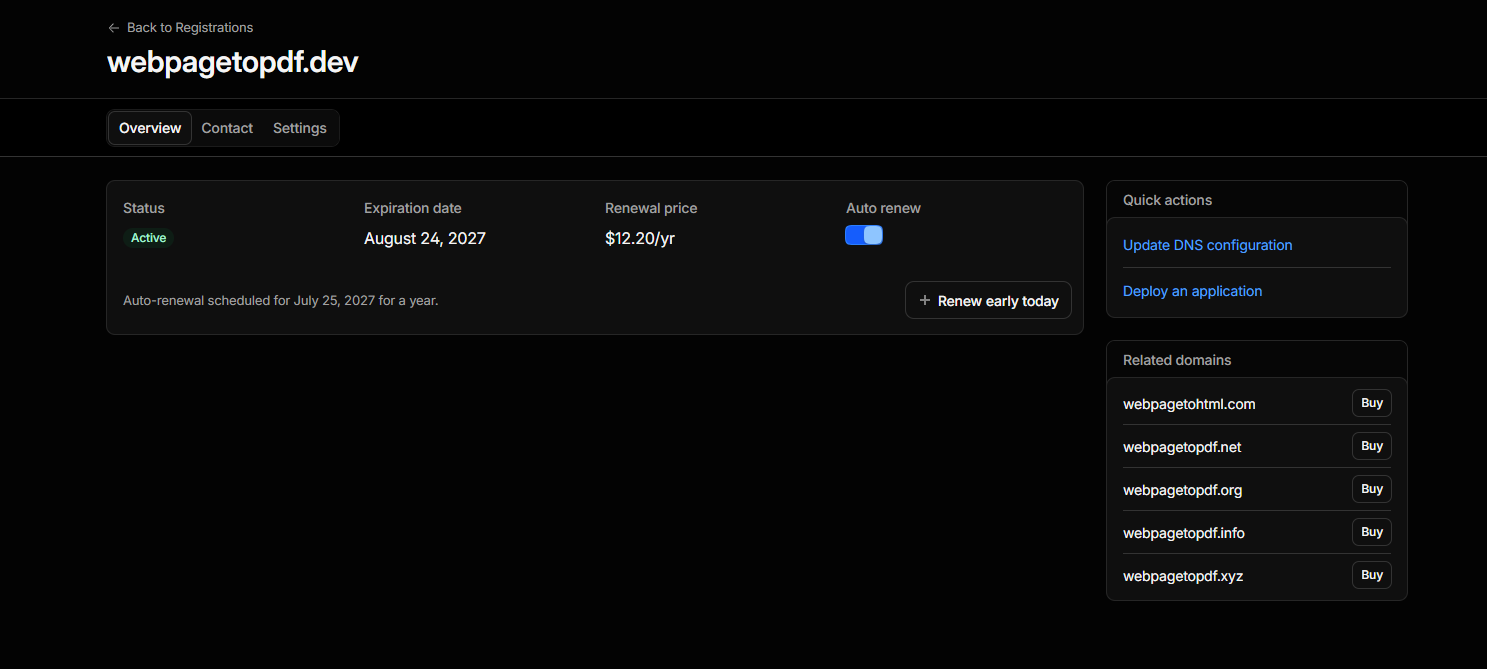
If Cloudflare or the registry sends a registrant email verification message, complete verification promptly. DNS resolution may be suspended if the registrant email is unverified or its verification becomes invalid. Keep contact information and payment methods up to date as they change.
See Cloudflare Registrar's official Register a new domain guide for the current purchase flow, field restrictions, and nameserver requirements.
Domains registered with Cloudflare must keep using Cloudflare DNS
This restriction still applies. While Cloudflare Registrar manages the domain, you cannot change its authoritative nameservers to another DNS provider. You can still use third-party website and email services by configuring the appropriate A, CNAME, MX, or TXT records in Cloudflare. You can also delegate an individual subdomain if needed.
If the entire domain must use another DNS service, first transfer it to another registrar. Be aware of transfer locks that may apply after a new registration, recent transfer, or registrant information change. Custom Nameservers on Business and Enterprise plans only customize Cloudflare nameserver names. They do not switch the domain to third-party DNS.
Buy from Spaceship and connect to Cloudflare
For a domain purchased from Spaceship, Spaceship continues to manage registration and renewals. You only need to move DNS management to Cloudflare. You do not need to buy the domain again or transfer it to Cloudflare Registrar.
The following steps use Cloudflare's Full setup: add the domain to Cloudflare, then replace the nameservers in Spaceship with those assigned by Cloudflare. Once connected, all DNS records are managed in Cloudflare while renewals remain with Spaceship.
Buy a domain from Spaceship
Open Spaceship domain search and enter the full domain you want to register. Before adding it to the cart, check its spelling, registration price, renewal price, registration term, and any ICANN fees. Do not consider only the first-year promotion.
Enter accurate contact information and complete payment, then return to Domain List to confirm that the domain appears in your account and can be managed. Hosting, Spacemail, and other add-ons recommended at checkout are not required to connect to Cloudflare. You can skip buying them if you do not need them yet.
Open Cloudflare's domain connection page
Sign in to the Cloudflare Dashboard and switch to the account where you plan to deploy Saavo. Open Domains and click Add domain in the upper-right corner.

Choose to connect an existing domain
Cloudflare lists three options: connect an existing domain, transfer a domain to Cloudflare, or buy a new domain. Since the domain is already registered with Spaceship, choose Connect a domain.
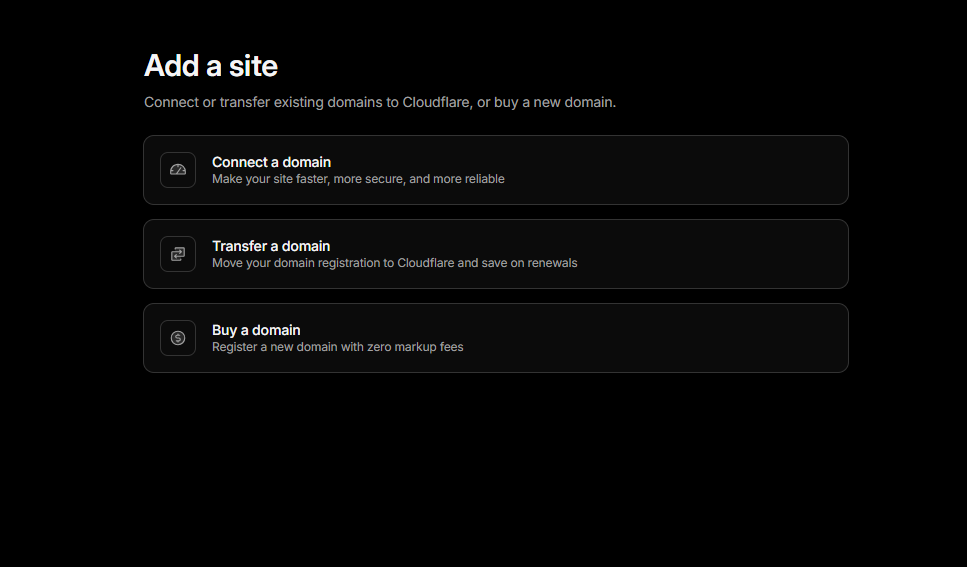
Do not choose Transfer a domain. Connecting gives Cloudflare control of DNS, whereas transferring changes the registrar.
Enter the root domain
In Domain name, enter the root domain, such as webpagetopdf.dev. Do not enter www.webpagetopdf.dev or include https://, a port, or a path.
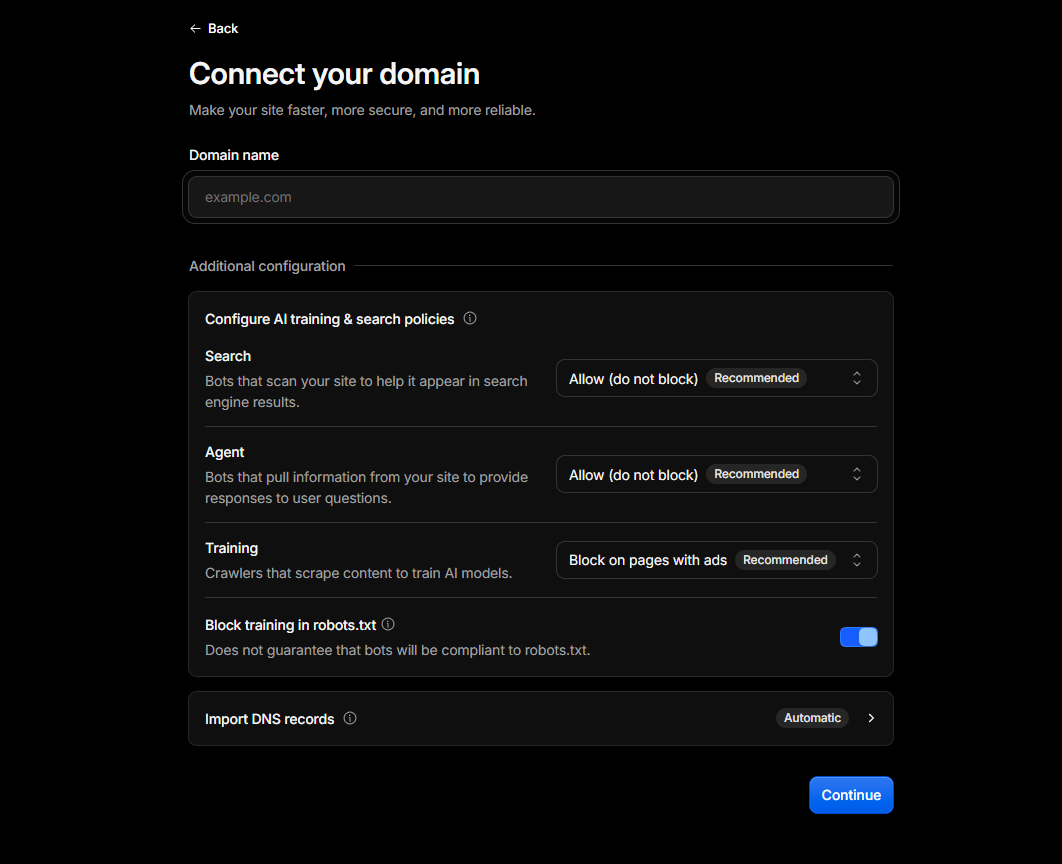
The lower part of the page also shows AI crawler policies and DNS record import options. These do not affect whether the domain can connect to Cloudflare. You can keep the defaults for the initial setup and adjust them later for your website. Check the domain and click Continue.
Choose a Cloudflare plan
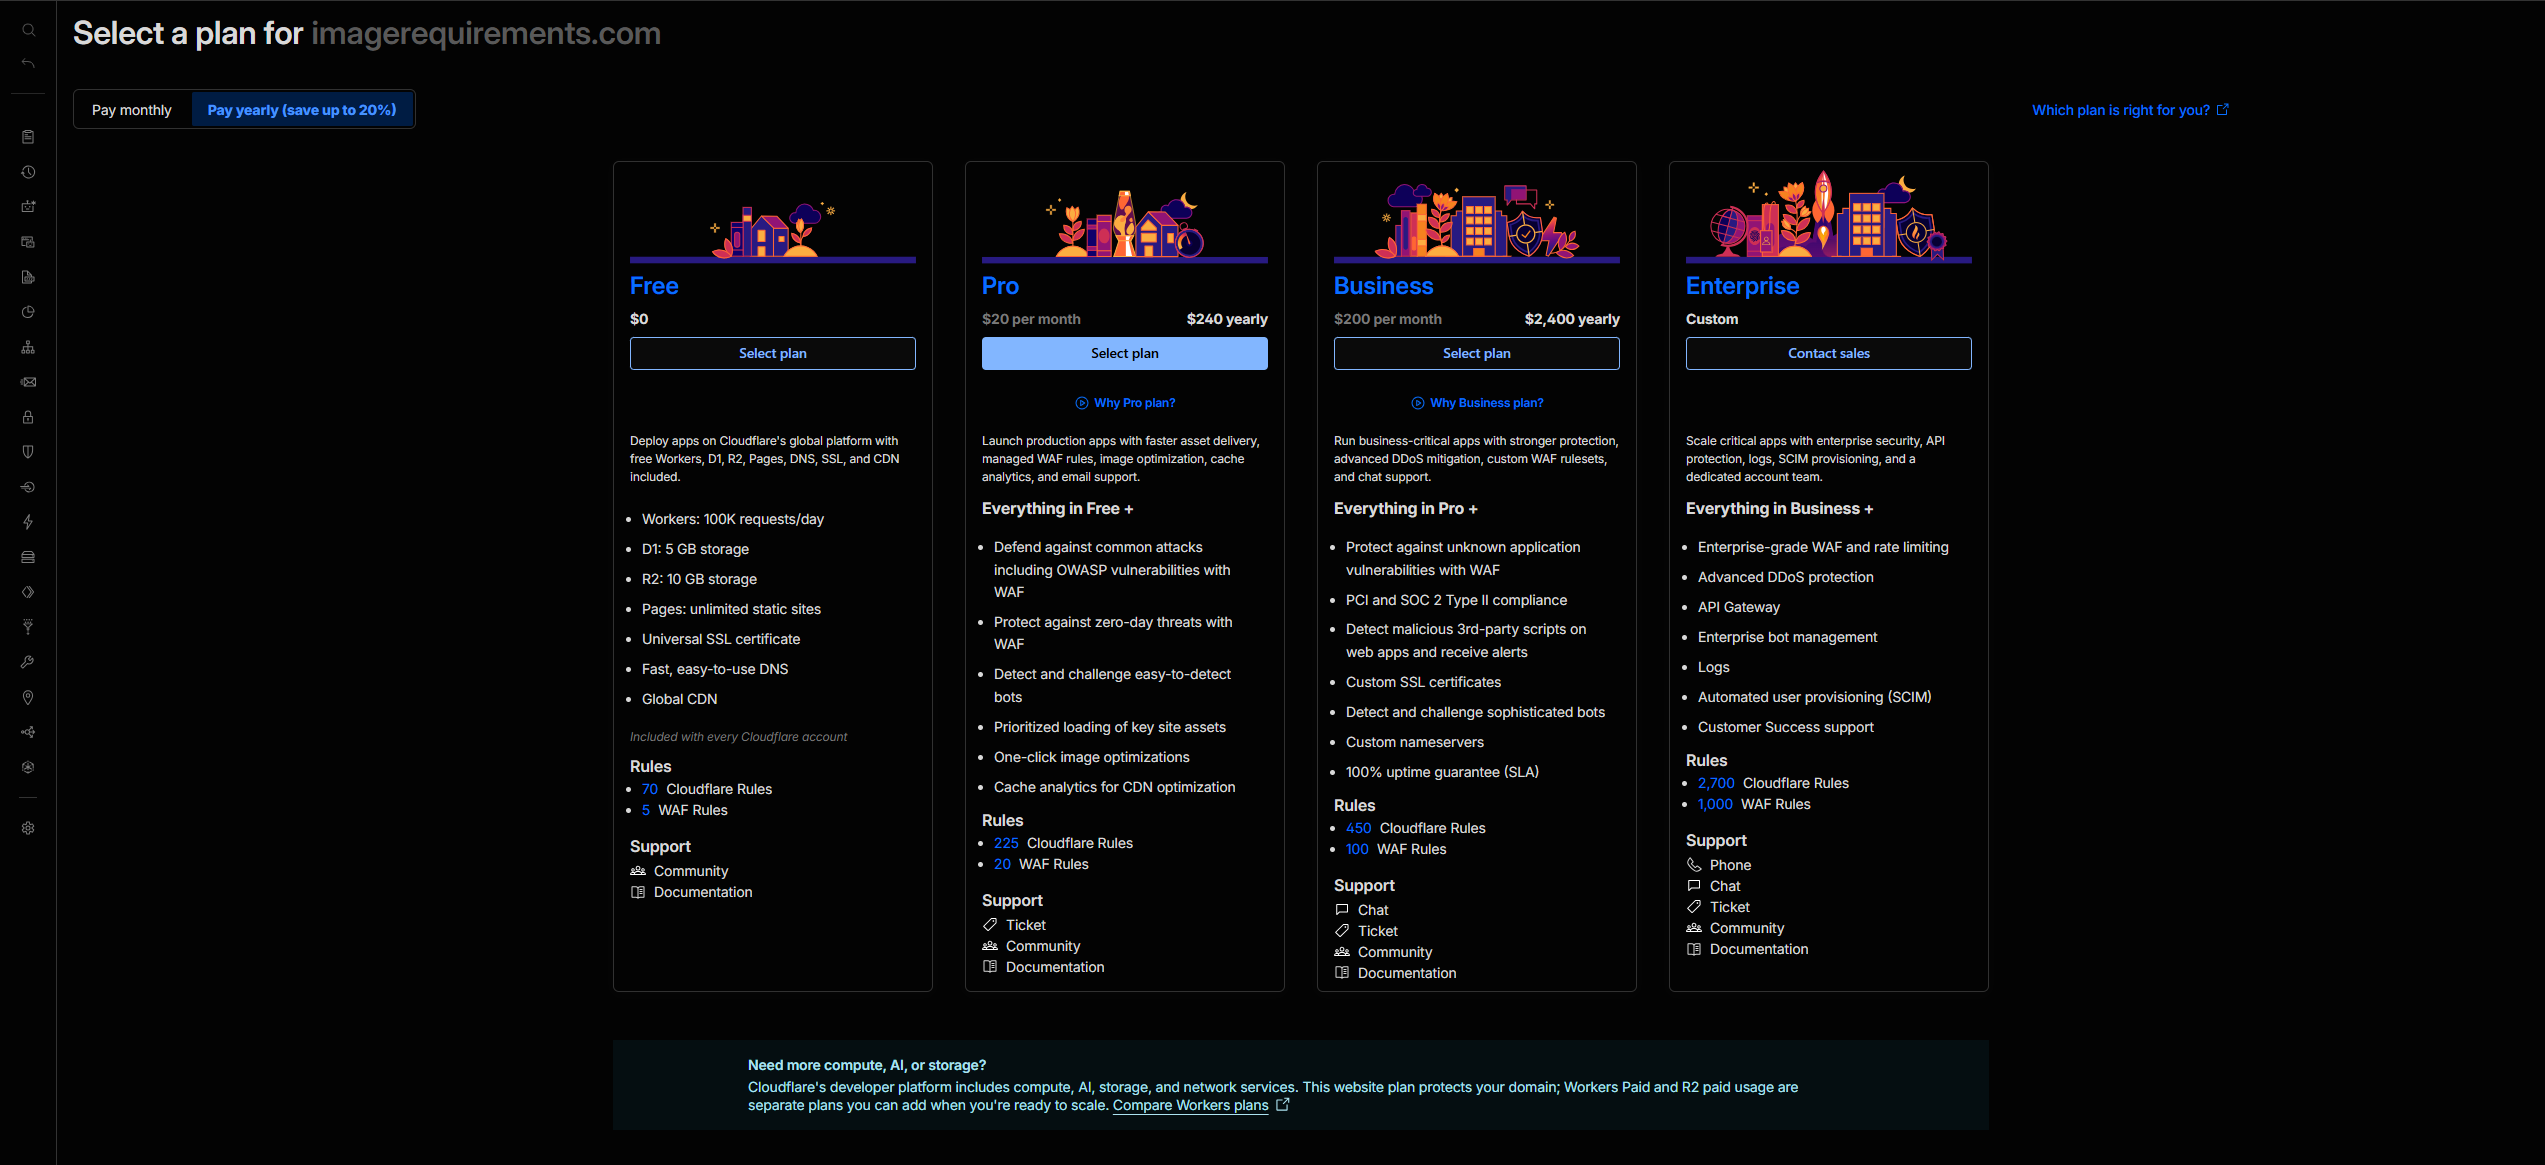
Cloudflare asks you to choose a plan for this domain. Free is sufficient when you first deploy a Saavo project. You can upgrade later if you need more advanced security, caching, or support.
Review scanned DNS records
After choosing a plan, you arrive at Review your DNS records. Cloudflare tries to scan records from the previous DNS service, but the results may be incomplete. Do not treat them as a full backup of the original records.
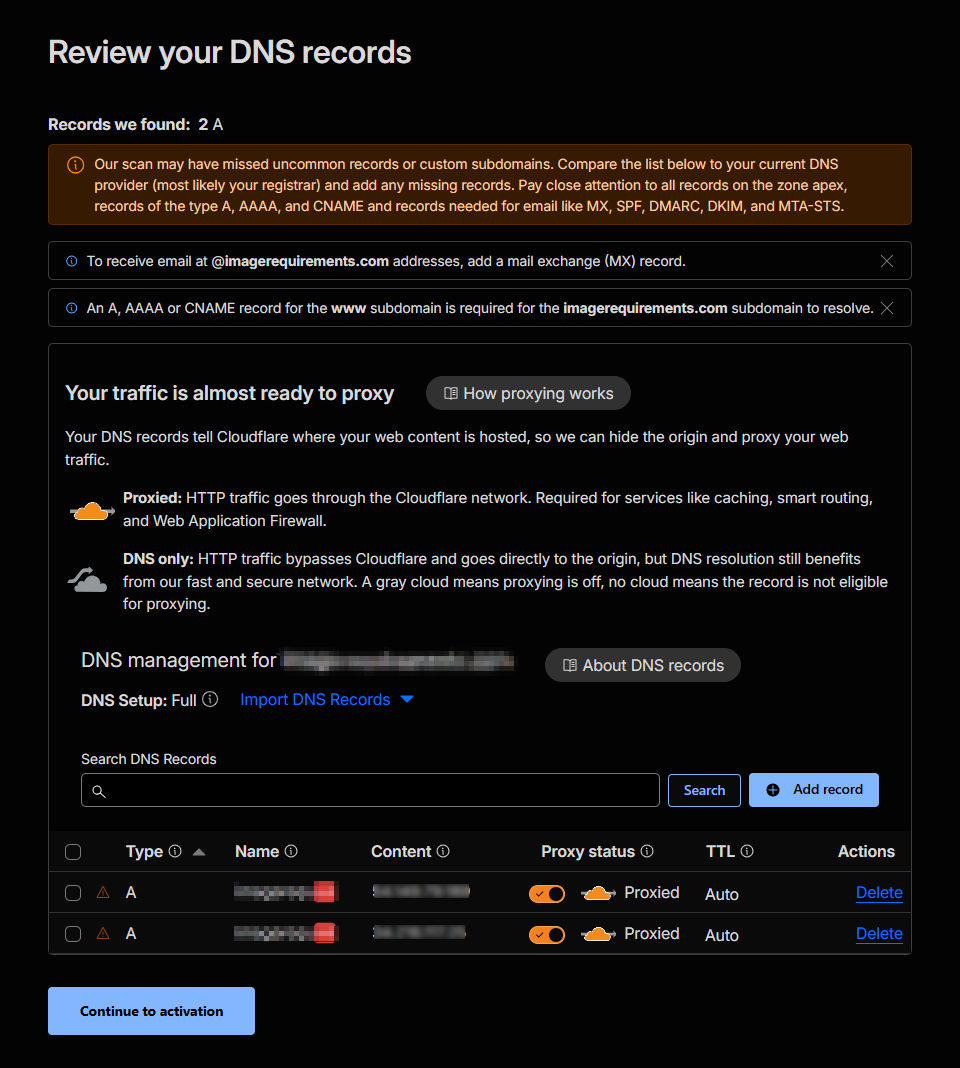
A newly purchased, unused domain usually has only parking page records added automatically by Spaceship. You can delete those records. If the domain already has a website, email, or other services, do not delete everything. First check each valid A, AAAA, CNAME, MX, TXT, and other record in the original DNS service and add any that are missing.
After checking the records, click Continue to activation. You can add or edit records later in Cloudflare under DNS → Records.
Keep the assigned nameserver addresses available
Cloudflare displays the old addresses to replace and the two Cloudflare nameserver addresses assigned to this domain. Keep the page open. You will enter these two addresses in Spaceship in the next step.
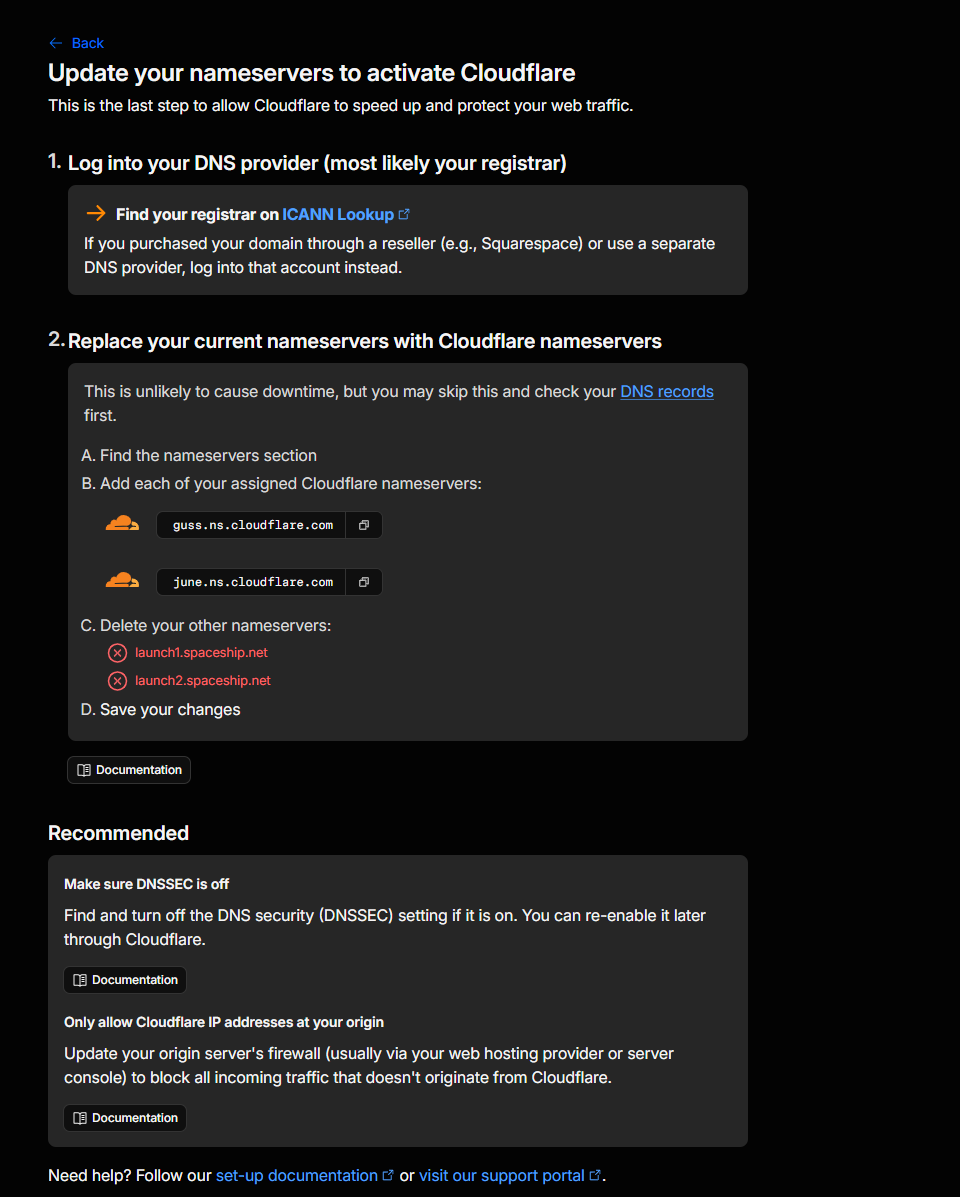
Assigned addresses may differ between domains. Copy the values shown on your own page, not guss.ns.cloudflare.com and june.ns.cloudflare.com from this guide's screenshot.
If DNSSEC was enabled for the domain, first disable it at the original DNS service and remove the old DS records. Re-enable DNSSEC through Cloudflare after Cloudflare confirms that the domain is connected.
Open domain details in Spaceship
Return to Spaceship and find the domain you just added to Cloudflare in Domain List. Click it to open the details panel on the right.
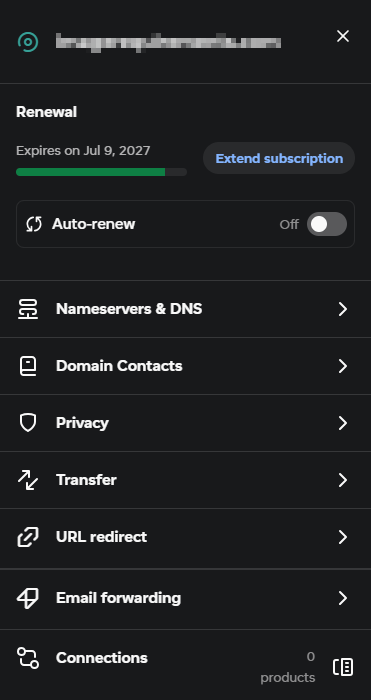
Open Nameservers & DNS
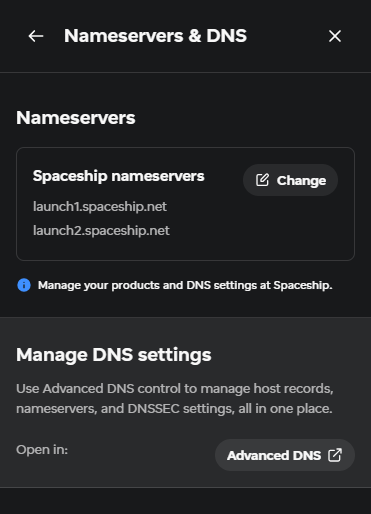
Click Nameservers & DNS in the details panel. The settings page shows that Spaceship nameservers are currently in use. Click Change.
Switch to Cloudflare nameservers
In the panel, choose Custom nameservers and remove the original Spaceship addresses:
launch1.spaceship.net
launch2.spaceship.net
Enter the two addresses Cloudflare assigned to this domain. For the domain in this page's screenshot, they are:
guss.ns.cloudflare.com
june.ns.cloudflare.com
These are examples. You must use the addresses on your own Cloudflare page. Check that both addresses are complete, contain no extra spaces, and do not include any old Spaceship addresses, then save.
If Spaceship warns that existing product connections and DNS records will stop working, first confirm that the records you need to keep have been added to Cloudflare, then confirm the switch. The original records in Spaceship will no longer be used for public DNS resolution.
Notify Cloudflare and wait for activation
Return to the Cloudflare setup page and click I updated my nameservers at the bottom. Cloudflare starts checking the nameservers. The domain initially shows Pending Nameserver Update, then changes to Active once confirmed.
Nameserver changes usually do not take effect immediately. Cloudflare says this can take up to 24 hours, and Spaceship says full global DNS propagation may take 48 hours. Do not repeatedly switch back to Spaceship nameservers while waiting, as this only makes the status harder to interpret.
Once the domain is Active, manage its DNS records in Cloudflare. If you disabled DNSSEC earlier, re-enable it now using the DS information provided by Cloudflare.
If the status remains Pending Nameserver Update after 24 hours, check that Spaceship saved the changes, both addresses are complete, no Spaceship nameservers remain, and the registry has no old DS records. See Cloudflare's Pending Nameserver Update and Full setup guides for detailed troubleshooting.
Changing nameservers does not transfer the domain
After connection, Cloudflare manages DNS records while Spaceship still manages renewals. Do not disable automatic renewal or remove registrant information in Spaceship just because Cloudflare shows Active.
Plan how to use the domain
Before adding records, decide what each name will do. A simple product could use this arrangement:
| Name | Purpose | Configured through |
|---|---|---|
webpagetopdf.dev | The website's only production entry point | Saavo domain:set |
www.webpagetopdf.dev | Redirect to the production entry point | Cloudflare Redirect Rules |
support@webpagetopdf.dev | Receive user email | Cloudflare Email Routing |
mail.webpagetopdf.dev | Send system email through Resend | Resend + Cloudflare DNS |
files.webpagetopdf.dev | Expose R2 files publicly | R2 Custom Domain |
support@webpagetopdf.dev is an email address, not a website subdomain to create. mail and files are actual DNS subdomains. Do not assign the same subdomain to both Resend and R2.
Bind the website domain
First complete npm run deploy:init and confirm that the workers.dev address opens correctly. Saavo's domain command requires an existing remote Worker and .env.production, so it is not suitable before the initial deployment.
From the project root, run:
npm run domain:set -- https://webpagetopdf.devThis command performs four tasks:
- Writes a Worker Custom Domain to
wrangler.jsonc. - Changes
VITE_SITE_URLin.env.productionto the production address. - Checks, builds, and deploys the project again.
- Visits the new domain for a health check.
Cloudflare creates the required DNS records and issues a certificate for the Worker. Do not manually create a CNAME for the same hostname beforehand. Custom Domain creation fails if that name already has a CNAME. Check whether the old record is still in use before deciding to delete it.
After the command succeeds, update these settings for the production domain:
- Add
webpagetopdf.devto the Turnstile widget's Hostname Management and write the real keys to.env.production. - If GitHub or Google sign-in is enabled, update the OAuth callback URL on the corresponding platform.
- If Stripe is enabled, update the webhook URL in Stripe.
- Check that the site name, canonical URL, Open Graph, and sitemap use the production domain.
domain:set prints the new OAuth callback and Stripe webhook URLs in the terminal. It does not update those platforms for you or change Resend domain settings or the R2 custom domain.
Handle the www address
We recommend keeping a single production entry point, such as https://webpagetopdf.dev. Worker Custom Domains match hostnames exactly. Binding the root domain does not automatically cover www.webpagetopdf.dev.
If users should also be able to enter www, create a Cloudflare Redirect Rule from www.webpagetopdf.dev to https://webpagetopdf.dev, preserving the original path and query parameters. The www redirect source also needs a proxied DNS record. Cloudflare's Custom Domains documentation provides a placeholder address for setups without an origin server.
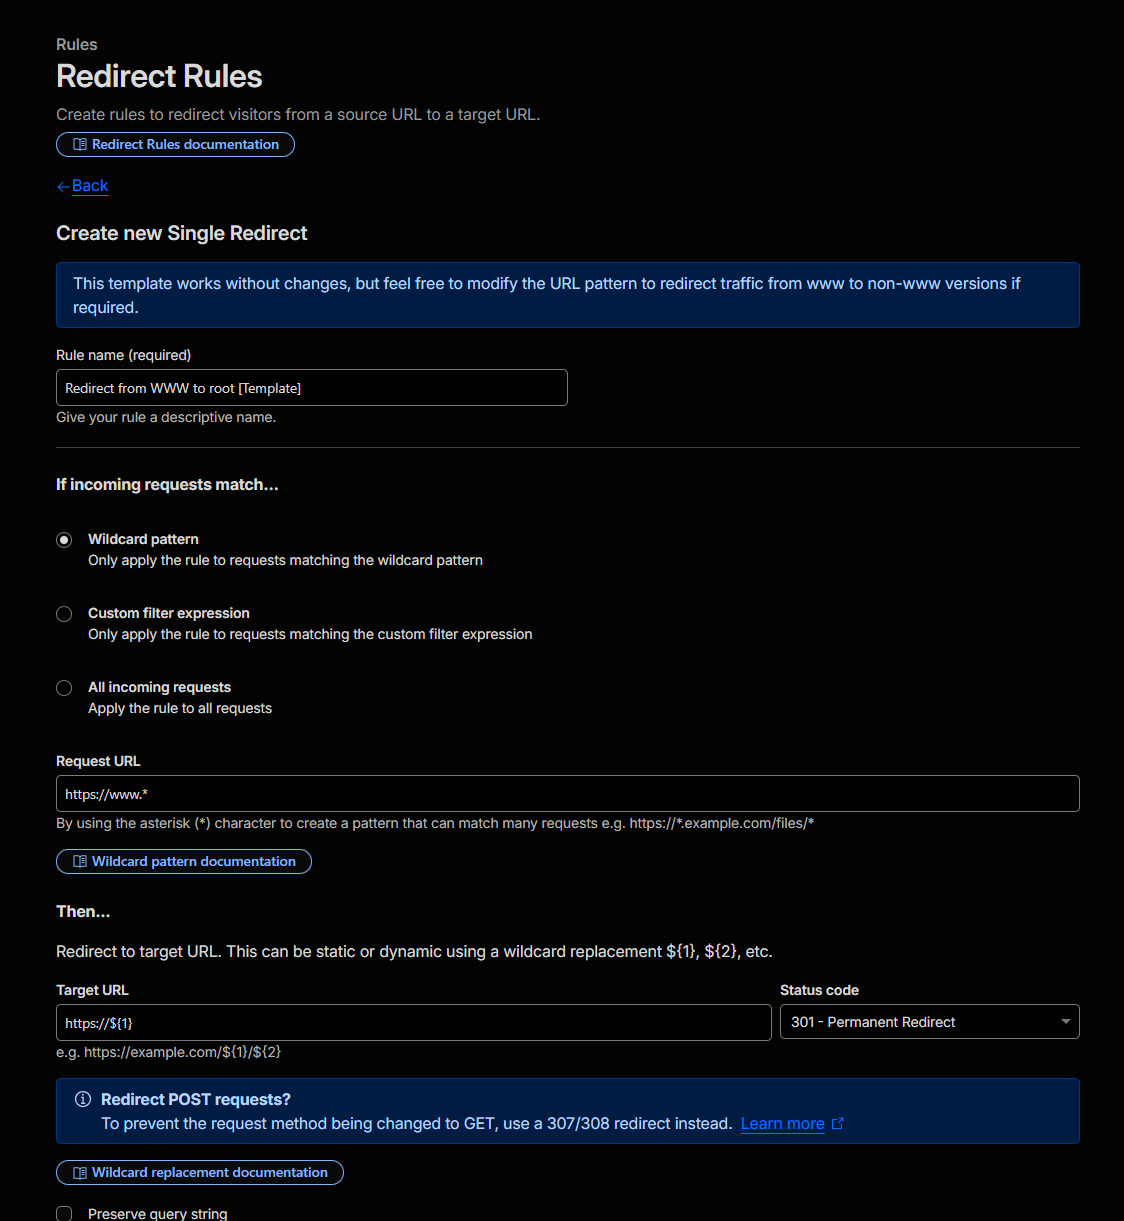
Do not serve full pages from both the root domain and www. Keeping both entry points indefinitely increases the chance of inconsistencies in cookies, OAuth callbacks, and search engine canonical URLs.
Configure incoming email
supportEmail in config/base.ts only tells Saavo which support address to display and which address to use as Reply-To for system emails. Entering support@webpagetopdf.dev does not create a mailbox. You must configure a way to receive email separately.
Choose an option based on what you need:
| Need | Suitable option | Recommendation |
|---|---|---|
Receive messages sent to support@... | Forward to an existing mailbox with Cloudflare Email Routing | The simplest option, suitable for most Saavo projects |
| A separate inbox with search, attachments, and management by multiple people | A professional email service or a separately deployed open-source webmail application | Do not rely on forwarding alone |
| Many temporary addresses, verification-code inboxes, or an email API | A temporary email project built on Workers | Suitable for developer tools, not an official support mailbox |
Forward support email to an existing mailbox
Cloudflare Email Routing does not provide a new inbox. It receives messages sent to support@webpagetopdf.dev and forwards them to your existing Gmail, Outlook, or other mailbox.
Enable Email Routing for the domain
Sign in to the Cloudflare Dashboard, open Compute → Email Service → Email Routing, click Onboard Domain, and select webpagetopdf.dev.
Cloudflare adds the MX, SPF, and DKIM records needed to receive email for the root domain. Check the domain shown on the page, then complete onboarding. DNS records usually take effect within a few minutes, though some cases take longer.
Add and verify the receiving address
Open Destination Addresses, enter the email address you actually use in the lower part of the page, and click Add address.
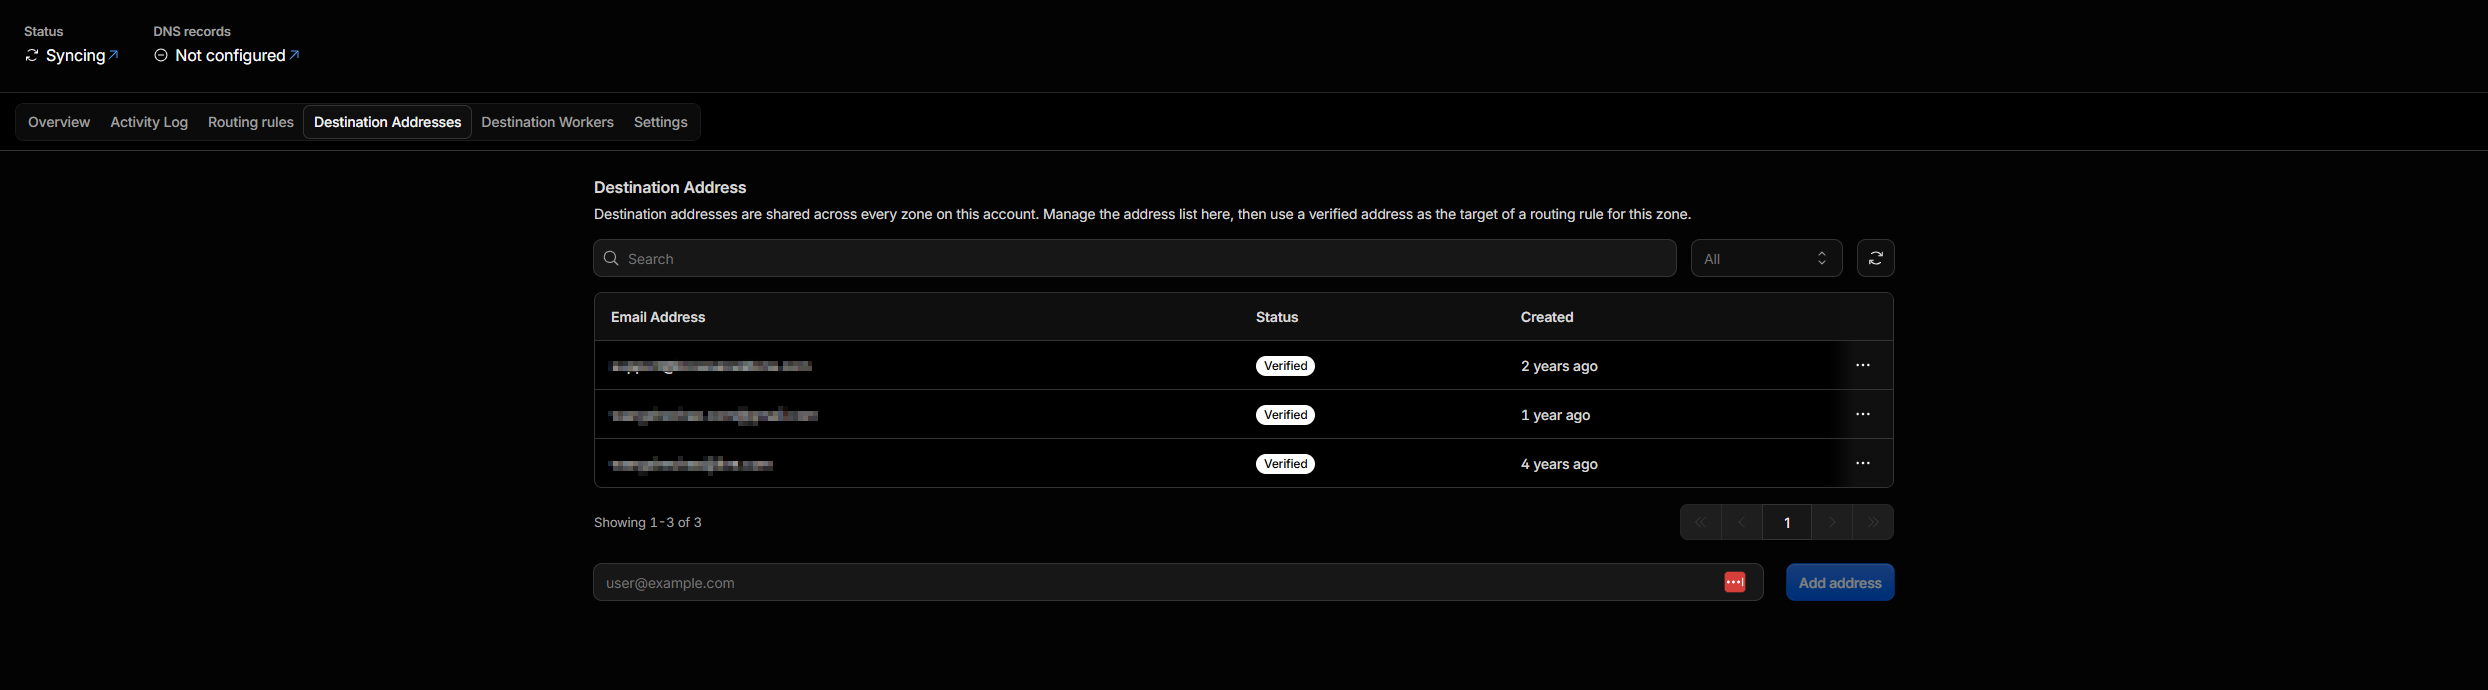
Cloudflare sends a verification email to this address. Open it and click the verification link. A destination address belongs to the entire Cloudflare account, so multiple domains can reuse the same verified address. Forwarding rules pointing to it do not take effect until verification is complete.
Create a support forwarding rule
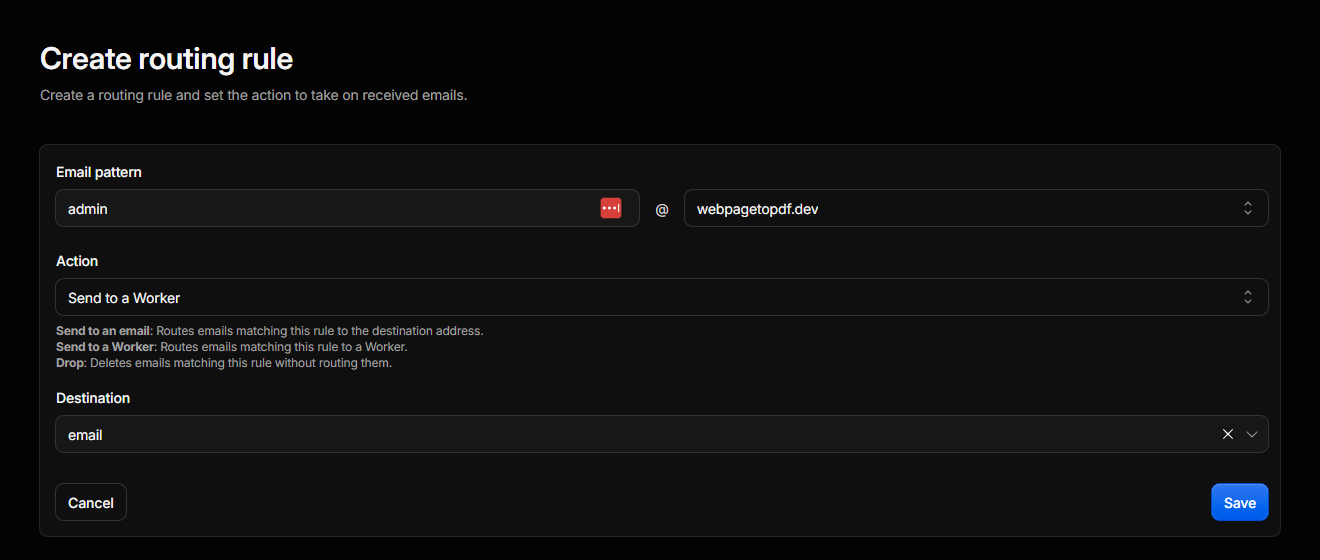
Return to Email Routing, select webpagetopdf.dev, open Routing Rules, and click Create routing rule.
Use these settings:
| Setting | Value |
|---|---|
| Email pattern | support |
| Action | Send to an email |
| Destination | The receiving address you just verified |
After saving, messages sent to support@webpagetopdf.dev are forwarded to that mailbox. Unless you need messages sent to arbitrary addresses, enabling Catch-all at the start is not recommended. Accepting mail for every address on a public domain can easily attract large amounts of spam.
Test forwarding and update Saavo
Send a test message to support@webpagetopdf.dev from another mailbox. Do not send it from the destination address to yourself. Some email services merge, hide, or discard these messages, which can make forwarding appear broken.
Once you confirm that email arrives, update Saavo's configuration:
supportEmail: 'support@webpagetopdf.dev',Cloudflare updates its official email routing instructions as the dashboard changes. If navigation differs slightly from this guide, use Domain, Destination Addresses, and Routing Rules under Email Service → Email Routing.
Forwarding does not provide a complete mailbox
If you reply to a forwarded message directly from your personal mailbox, recipients usually see your personal email address. Use a complete email service or deploy your own webmail application if you need to always send and receive as support@webpagetopdf.dev, or need sent mail, drafts, search, and team collaboration.
Do not let two services handle the root domain's incoming email
If the root domain already uses Google Workspace, Microsoft 365, Spacemail, or another email service, do not enable Cloudflare Email Routing and overwrite its existing MX records. Choose which service will receive email, then use that service's DNS records. Adding two sets of MX records does not provide reliable delivery to both services.
Build your own inbox with a Worker
Email Routing can forward to a Worker as well as to an existing mailbox.
After receiving a message, the Worker can parse its body and attachments, save data to D1, Durable Objects, or R2, and provide an inbox through a web interface or API.
These projects typically use this structure:
External mail server
    ↓
Cloudflare Email Routing
    ↓
Email Worker
    ├─ D1 / Durable Objects: messages, sessions, and mailbox information
    ├─ R2: attachments
    └─ Web UI or API: read, search, and manage email
They are not traditional SMTP or IMAP servers running inside a Worker. Cloudflare still handles incoming mail. Sending to arbitrary external addresses requires one of these channels:
- Cloudflare Email Sending: Send directly through a
send_emailbinding. Sending to arbitrary addresses requires a Workers Paid plan. - Resend: Simple to configure and consistent with Saavo's current default email provider.
- Other SMTP services or email APIs: Support depends on the specific open-source project.
Storing email yourself is not necessarily more reliable than forwarding. Worker timeouts, parsing failures, and incorrect D1 or R2 configuration can also prevent receipt. You also need to handle sign-in protection, attachment security, spam, backups, and data retention. This maintenance is worthwhile only if you need a separate inbox or email API.
Open-source projects you can deploy
The following projects have public source code, clear licenses, recent maintenance, and Cloudflare Workers as a core component. Star counts are approximate figures from GitHub in August 2026. They indicate community size, not readiness to store important email.
| Project | Community size | Purpose | Considerations |
|---|---|---|---|
| cloudflare/agentic-inbox | About 7k stars | Cloudflare's complete webmail example, with sending, receiving, search, conversations, attachments, and AI-drafted replies | Uses Email Routing, Durable Objects, R2, Workers AI, and Email Sending. Production requires Cloudflare Access. Every user allowed by the same Access policy can access all mailboxes. |
| dreamhunter2333/cloudflare_temp_email | About 11.5k stars | A relatively full-featured temporary email service with multiple domains, attachments, forwarding, an API, an admin dashboard, and multiple sending methods | Still intended for temporary email. SMTP and IMAP proxies require an additional Python service, so not every feature depends solely on Cloudflare. |
| oiov/vmail | About 1.5k stars | A lighter temporary email service with multiple domains, D1 storage, a REST API, and sending | Suitable for verification-code inboxes or developer tools. Sending requires choosing Cloudflare Email, Resend, or MailChannels separately. |
| G4brym/email-explorer | About 150 stars | Self-hosted webmail for everyday use, with user and mailbox management, sending, receiving, search, and attachments | A smaller community. You must maintain authentication, backups, resource usage, and version upgrades yourself. |
Choosing an option for Saavo
For a typical product that only needs to receive support messages, Email Routing forwarding is sufficient, with Resend continuing to send system email. If you need separate webmail, deploy Agentic Inbox or Email Explorer as its own project instead of adding it directly to Saavo's main Worker. Temporary email projects are better suited to developer tools, verification-code testing, or email API products than to storing official support correspondence.
Choose an email sending service
Receiving and sending email require separate configurations. Email Routing handles messages sent to support@webpagetopdf.dev. An email sending service lets Saavo send registration verification, password reset, and account security notifications to users.
Saavo currently supports Resend and Cloudflare Email Sending. Both use the same business code, but their deployment requirements differ:
| Sending method | Project configuration | Prepare before deployment | Best suited for |
|---|---|---|---|
| Resend | emailProvider.type: 'resend' | Verify a sending domain and create RESEND_API_KEY | Saavo's default. Simple setup with a separate email platform. |
| Cloudflare Email | emailProvider.type: 'cloudflare' | Activate Workers Paid, add the sending domain to Email Sending, and configure the EMAIL binding | Projects already using Workers Paid that also want Cloudflare to manage email |
Cloudflare Email Sending is still in beta
Email Routing is available on Workers Free and Paid plans, but sending to arbitrary users through Email Sending requires Workers Paid. Quotas and prices may continue to change. Before choosing it, check Cloudflare's current pricing and the quotas shown in your account.
Use Resend
Resend is the template's default. Unless you have a specific reason to switch to Cloudflare, keep this configuration:
emailProvider: {
    type: 'resend',
},
We recommend a separate subdomain, such as mail.webpagetopdf.dev, with a sender address such as send@mail.webpagetopdf.dev. During the initial deployment, deploy:init asks for RESEND_API_KEY. See Configure Resend for the complete domain verification, API key, and Saavo configuration steps.
Use Cloudflare Email Sending
Cloudflare Email Sending does not need RESEND_API_KEY, but you must first activate Workers Paid and add your sending domain to Email Service. The example below uses email.webpagetopdf.dev, as shown in the screenshots.
Open Email Sending
Sign in to the Cloudflare Dashboard and open Compute → Email Service → Email Sending.
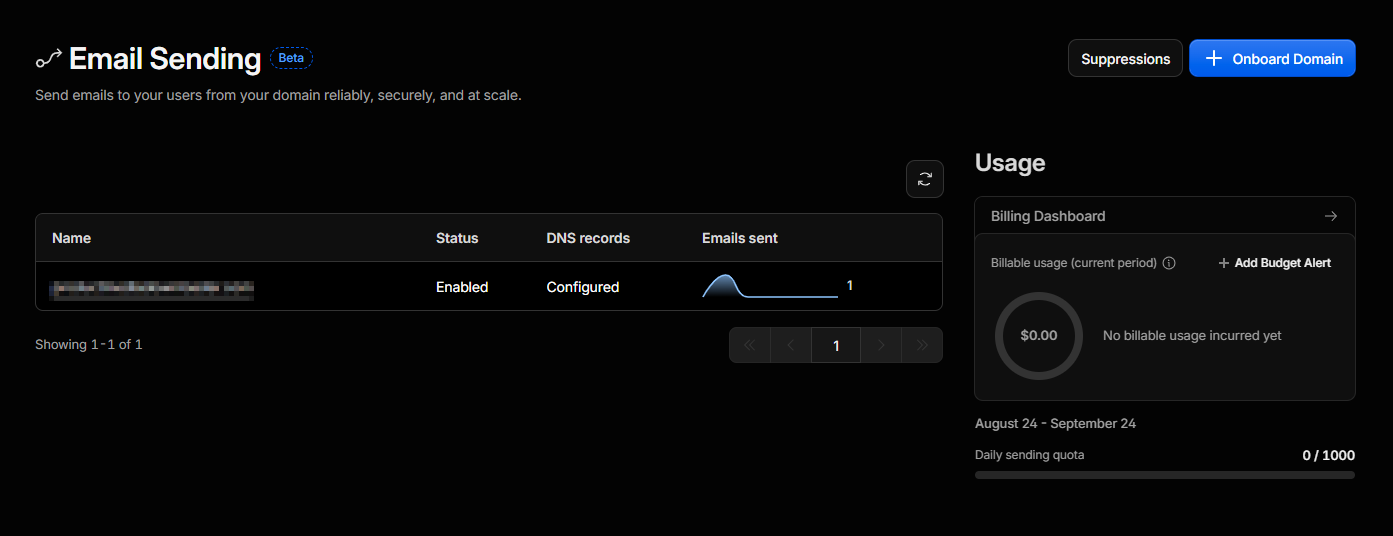
The right side shows usage and the sending allowance for the current period. Click Onboard Domain in the upper-right corner to add a sending domain.
Choose a sending domain
Select webpagetopdf.dev under Zone. We recommend a dedicated sending subdomain, such as email.webpagetopdf.dev. Leaving Subdomain empty uses the root domain for sending.
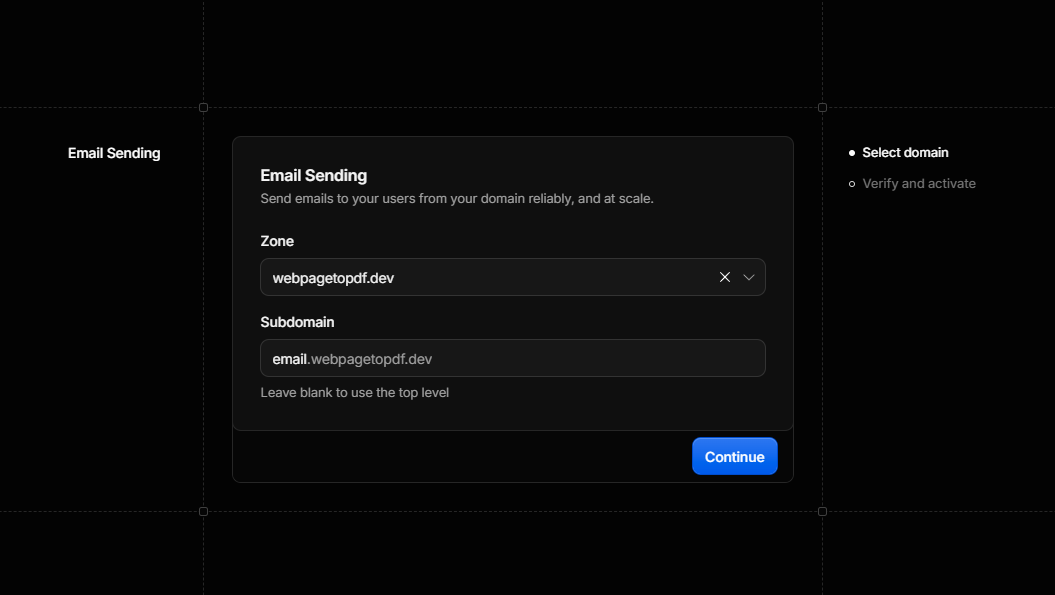
The sender address you configure later must belong to the domain added here. The screenshot uses email.webpagetopdf.dev, so Saavo can use send@email.webpagetopdf.dev. You cannot keep an address from a different sending domain.
Confirm the selection and click Continue.
Review and add DNS records
Cloudflare lists the MX and TXT records it will add for bounce handling, SPF, DKIM, and DMARC. These usually use dedicated names such as cf-bounce, _domainkey, and _dmarc.
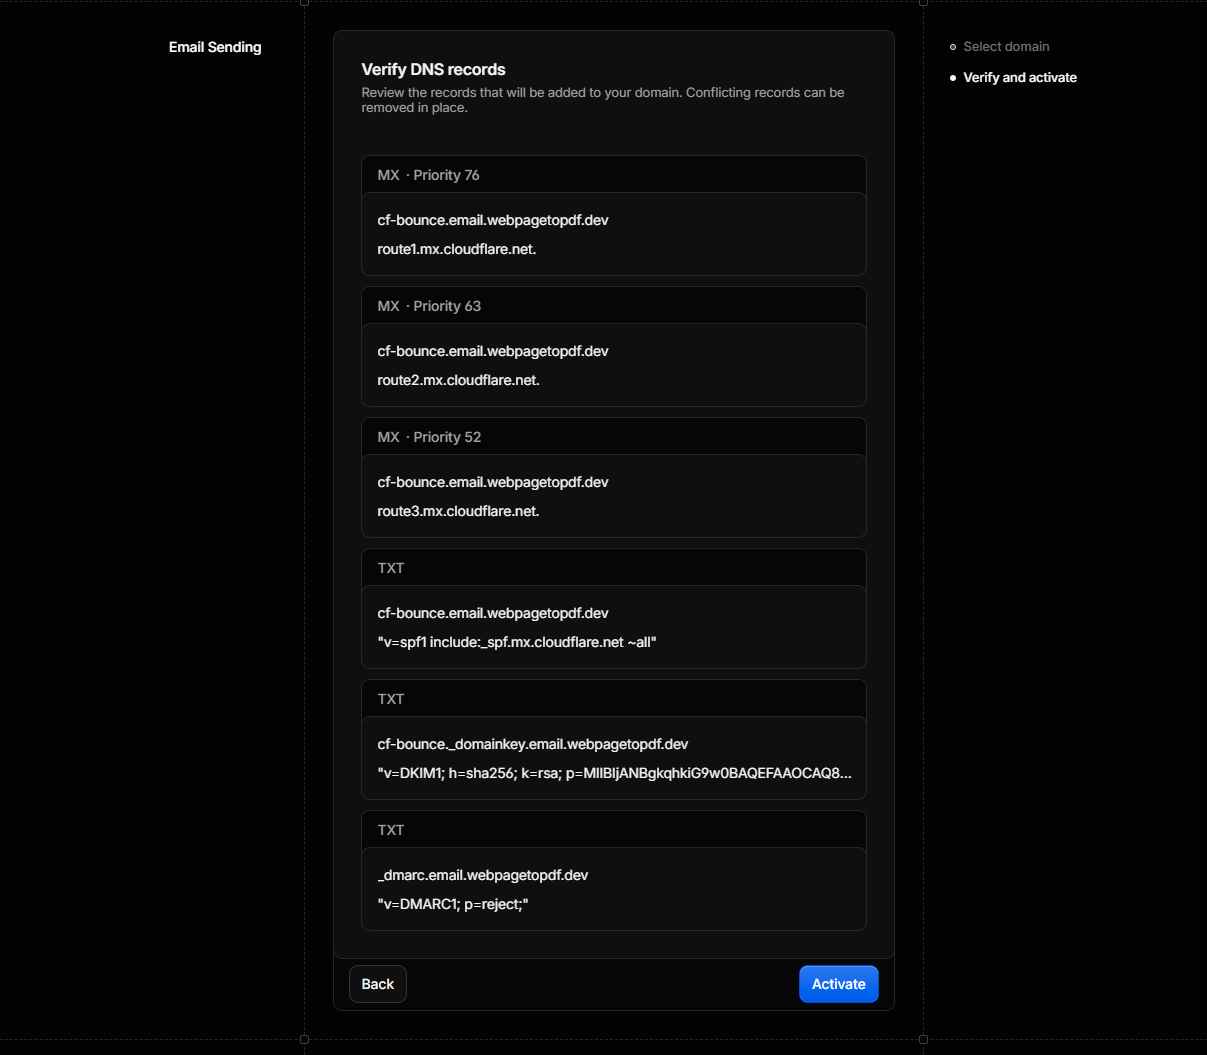
Do not copy the record values from this guide's screenshot. Confirm that the page is not asking you to delete conflicting records that are still in use, then click Activate to let Cloudflare add the values required for your domain.
Wait for the sending domain to activate
Return to the Email Sending list and wait for the domain to show Enabled and DNS records to show Configured. Cloudflare says this usually takes a few minutes when using its DNS, though some cases take longer.
Do not deploy to production before the domain is enabled. Even if the Worker has an EMAIL binding, sending will fail if the sender's domain is not allowed.
Update Saavo's email configuration
Change the email provider to Cloudflare:
emailProvider: {
    type: 'cloudflare',
},
Then change the sender to use the domain you just enabled. supportEmail is the address users reply to. You can keep support@webpagetopdf.dev if you have already configured it to receive email.
fromEmailAddress: {
    name: 'Webpage to PDF',
    email: 'send@email.webpagetopdf.dev',
},
supportEmail: 'support@webpagetopdf.dev',
Configure the EMAIL binding and deploy
If you have not yet performed the initial deployment, run npm run deploy:init. The script reads emailProvider.type and the sender address, creates a sender-restricted send_email binding in wrangler.jsonc, and no longer asks for RESEND_API_KEY.
If you switch from Resend to Cloudflare after the initial deployment, check wrangler.jsonc first. If there is no EMAIL binding, add it manually:
"send_email": [
    {
        "name": "EMAIL",
        "allowed_sender_addresses": [
            "send@email.webpagetopdf.dev"
        ]
    }
],
send_email is a top-level setting in wrangler.jsonc. Do not use a generic bindings: [{ type: 'email' }] entry. allowed_sender_addresses must also match fromEmailAddress.email in config/base.ts exactly.
After configuration, run:
npm run doctor
npm run deploy:update
Send a real test email
Trigger registration verification or a password reset in production. Confirm that an external mailbox receives the message and that the sender, Reply-To, and content are correct. If it does not arrive, check spam first, then check the sending result in Cloudflare Email Sending's logs and Suppressions.
An Enabled domain alone does not confirm that Saavo is configured correctly. The sending domain, fromEmailAddress, EMAIL binding, and deployed version must all agree.
Cloudflare currently supports Email Sending through Workers bindings, REST API, and SMTP. Saavo uses a Workers binding. See Cloudflare's Send emails and Configure sending bindings guides for details.
Bind a file domain to R2
Saavo's regular uploads access the bucket through the Worker's MAIN_R2 binding. Files remain readable through /uploaded/... without a file domain. Bind an R2 Custom Domain only when your application specifically needs to return separate public file URLs.
Using files.webpagetopdf.dev as an example:
- In the Cloudflare Dashboard, open Storage & databases → R2 object storage.
- Select the bucket created for this project by
deploy:init. - Open Settings and find Custom Domains.
- Click Add or Connect Domain and enter
files.webpagetopdf.dev. - Review the DNS records Cloudflare will add, then confirm the connection.
- Wait for the status to change from Initializing to Active.
- Upload a test file that can be public and access it through the new domain.
The R2 bucket and domain zone must be in the same Cloudflare account. Do not manually create a CNAME pointing to r2.dev. Cloudflare explicitly does not support connecting a production domain to R2 this way. See R2 Public buckets for the full restrictions.
After confirming that the domain can access objects, update Saavo's configuration:
upload: {
    // ...
    storage: {
        // ...
        r2: {
            publicBaseUrl: 'https://files.webpagetopdf.dev',
        },
    },
},
Then run:
npm run deploy:updatepublicBaseUrl affects only R2 upload results for permanently stored files that need absolute URLs. Avatars, support ticket images, and notification images that return relative URLs by default still use /uploaded/.... Files with an expiration time must also go through the Worker. Keep this set to false if the application does not need to generate public R2 URLs.
This setting does not disable public access already enabled in Cloudflare. To make the bucket private again, also disable its r2.dev address in R2 settings and remove any bound custom domains.
Binding an R2 domain makes objects public
A Custom Domain is suitable for public images, downloads, and other content that allows anonymous access. Do not place private files under a public domain just because it is convenient to configure. Continue accessing them through authenticated endpoints or short-lived signed URLs.
Buying the domain does not finish its configuration. The domain is fully connected to the project only after you separately verify the website, incoming email, outgoing email, and file access.