Admin dashboard
The administrator-only /dashboard. Use the admin role to access the existing dashboard and extend its pages for your product, without building another admin framework.
The Saavo template includes a complete admin console for common operational tasks involving users, payments, roles, entitlements, tickets, notifications, affiliates, analytics, and logs.
When developing your own product, you usually do not need to rebuild the dashboard. Add an administrator email address to configuration, then register and verify an account with that address to access the existing management features at /dashboard. Add new admin pages, routes, and APIs only when the existing dashboard does not meet your business needs.
Available features
After template initialization, the following management features are available out of the box:
| Module | Default entry point | Description |
|---|---|---|
| Overview | /dashboard | Operational statistics |
| Users | /dashboard/users | User management |
| Subscriptions | /dashboard/payments/subscriptions | Subscription snapshots |
| One-time purchases | /dashboard/payments/purchases | One-time purchase snapshots |
| Roles | /dashboard/roles | View and manually adjust roles |
| Entitlements | /dashboard/entitlement/list | View and manually grant entitlements |
| Quota events | /dashboard/entitlement/events | Grant and consumption auditing |
| Reaction | /dashboard/reaction/events, /dashboard/reaction/commands | Background events and command execution |
| OAuth clients | /dashboard/oauth-server | Authorization server clients |
| Tickets | /dashboard/tickets | Handle user tickets |
| Notifications | /dashboard/notifications | Publish in-app notifications to users |
| Affiliate users | /dashboard/affiliates/users | Referred users |
| Affiliate monthly settlements | /dashboard/affiliates/payouts | Commission settlement review |
| Analytics | /dashboard/analytics/* | First-party analytics, controlled by analytics.enabled |
| Logs | /dashboard/logs/system, /alert, /audit | System, alert, and audit logs |
All pages are accessed through /dashboard. Related APIs are grouped under /api/dashboard/* and share an administrator guard for permission checks.
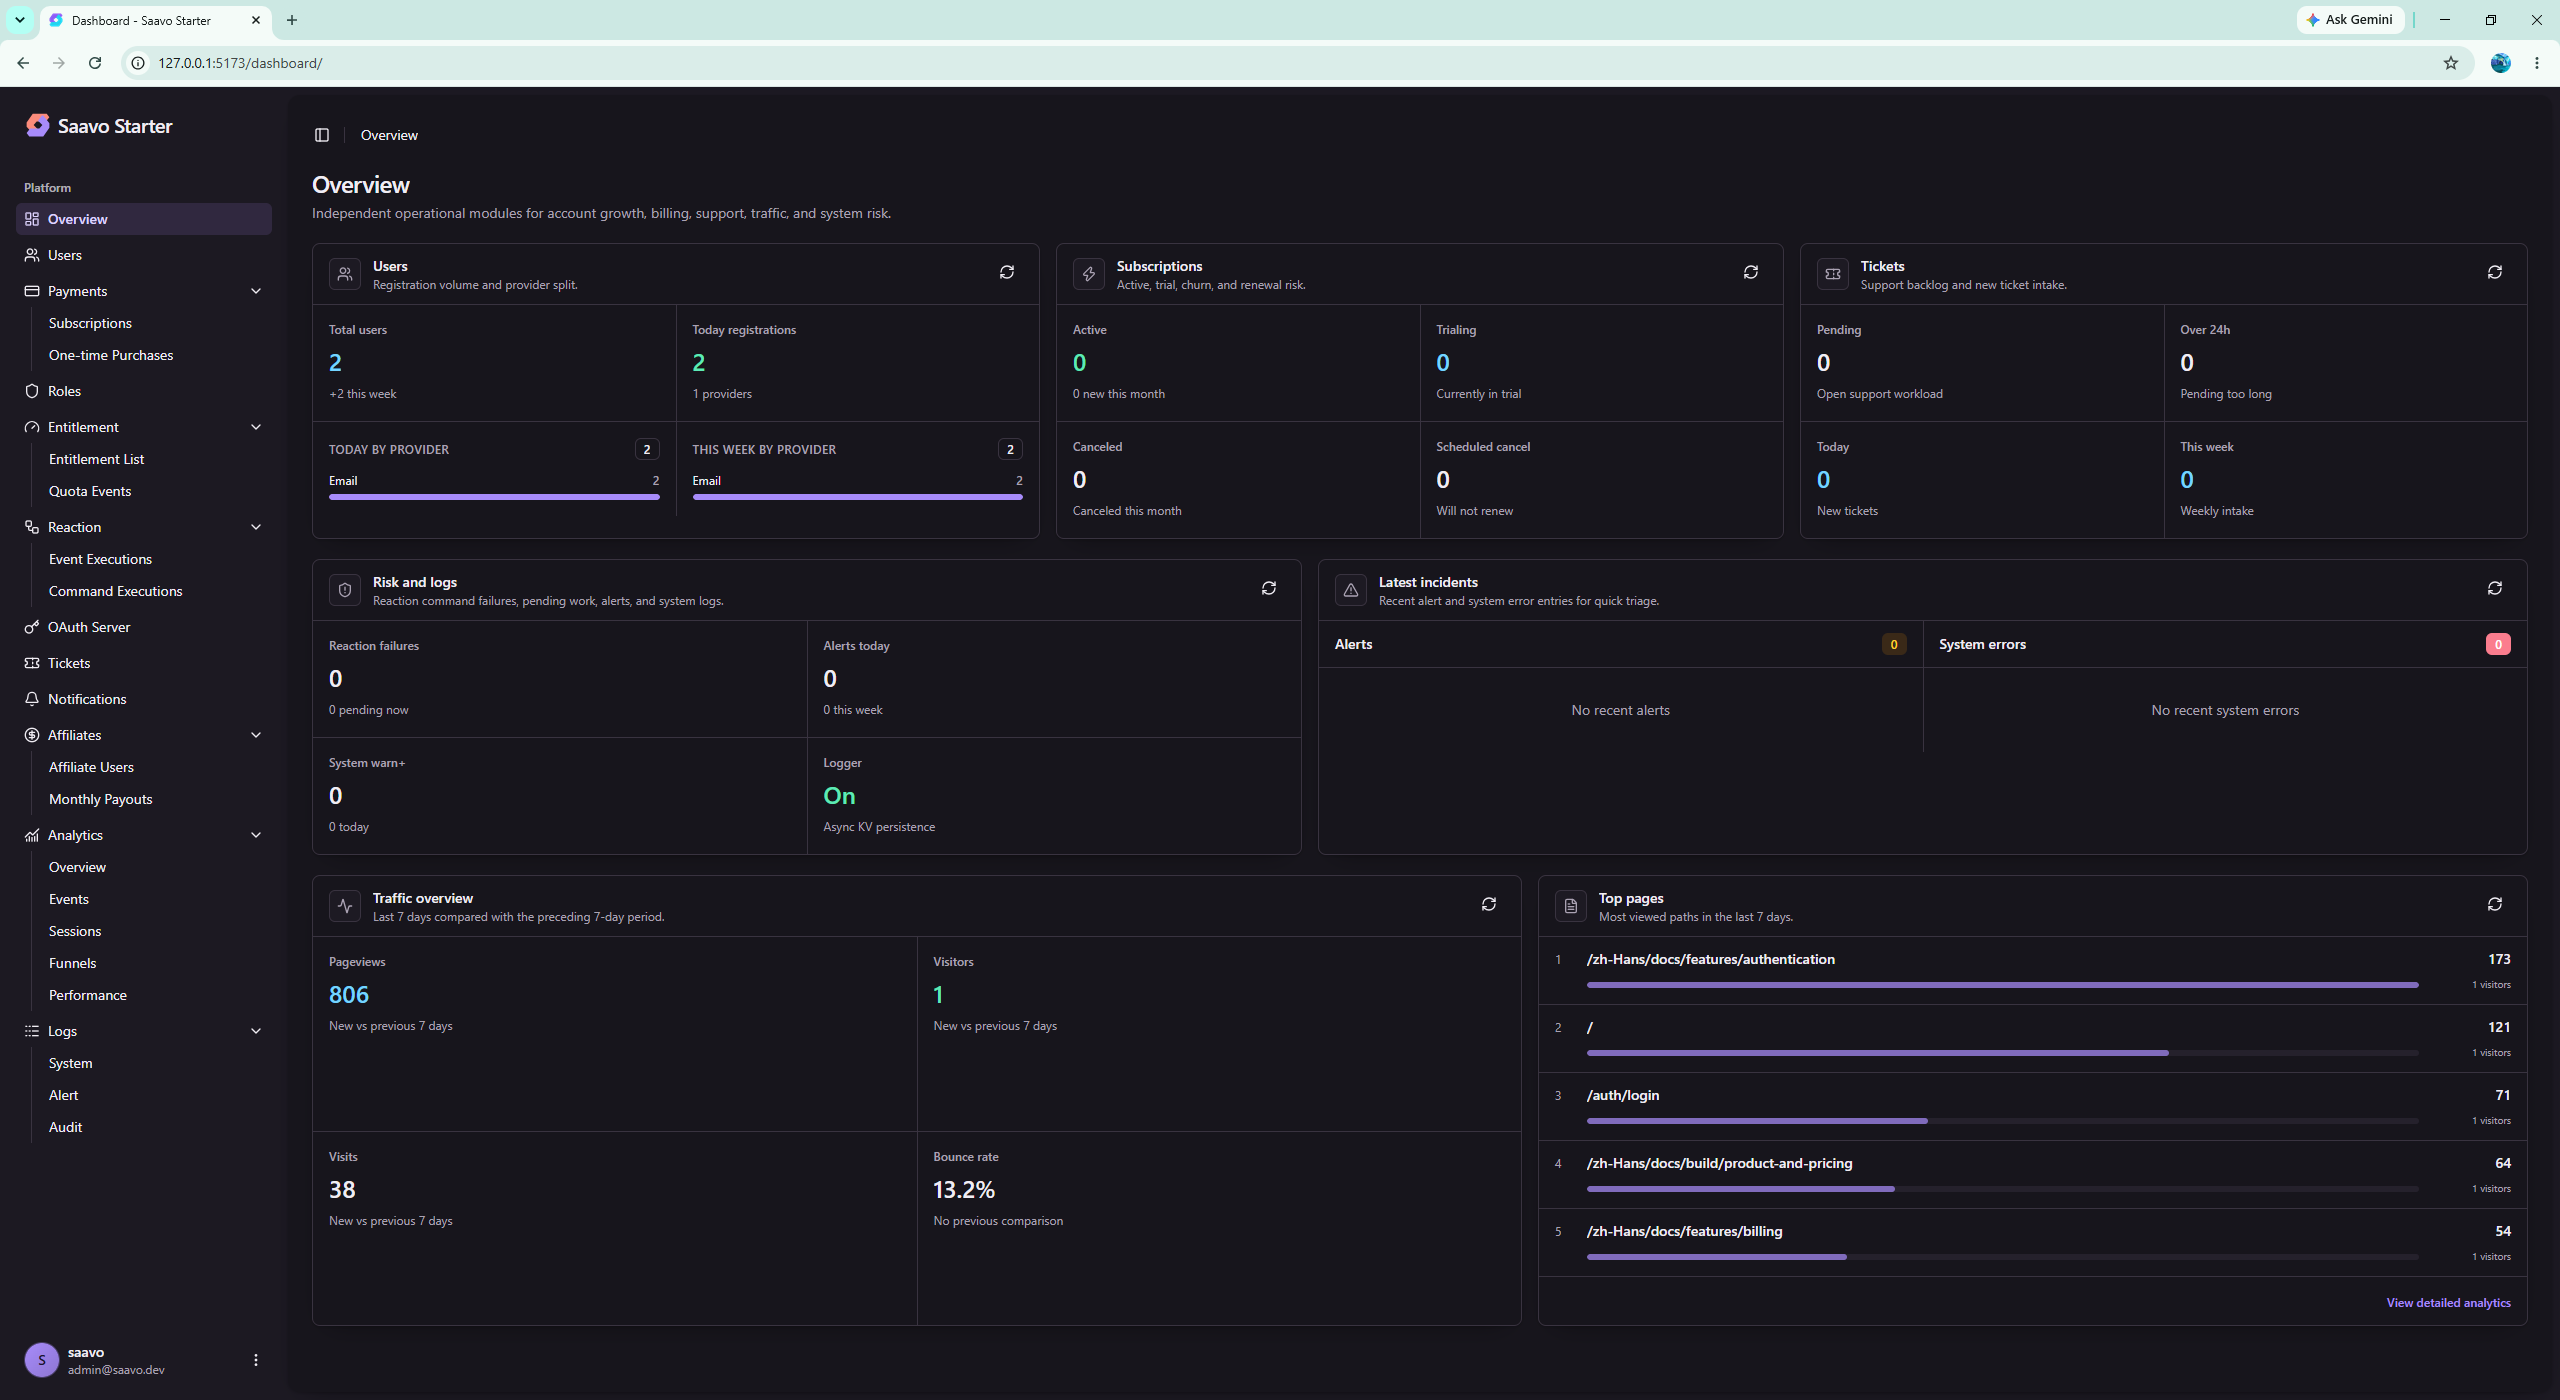
Try the admin dashboard first
Before changing the dashboard, you should explore its existing modules with an administrator account.
- Change
adminEmailsinconfig/base.tsto an address where you can receive verification emails, or first register locally with the defaultadmin@saavo.dev. - Administrator accounts also require email verification. They do not skip this authentication step before becoming administrators.
- Open
/dashboardand confirm that modules such as users, payments, and tickets are visible. - Open the same URL with an ordinary account. You should be redirected to the homepage.
The default administrator account creation flow is:
Add the email address to adminEmails
↓
The account signs up and verifies its email address
↓
The system grants the admin role
↓
Access /dashboard
Non-administrators who visit dashboard pages are redirected to the homepage or sign-in page.
Tip
Developers usually do not need to reimplement these admin pages. Confirm that administrator access works, then add the few management features your product needs.
Configure the admin dashboard
The default dashboard supports operations for the template's existing modules. Before launch, at least confirm who the administrators are.
Add administrators
Saavo configures administrators through adminEmails in config/base.ts:
adminEmails: ['admin@your-domain.com'],Register with that email address and complete email verification to receive the admin role. The address must match exactly. admin+test@example.com is not treated as admin@example.com.
adminEmails does not create a superuser account that bypasses authentication. Administrators start as ordinary users and receive administrator status only when their verified email address matches one in the configuration.
You should create your own administrator account soon after product initialization and confirm that it can access the dashboard.
Hide management modules you do not need
The analytics.enabled setting in config/deploy.ts controls analytics. Disabling first-party analytics removes the analytics entry from the dashboard.
Other management modules currently have no separate dashboard page switches. Even if the product does not use tickets, affiliates, or OAuth clients yet, their pages may remain visible to administrators. To hide these entry points completely, adjust the dashboard navigation configuration.
Design permissions before adding staff roles
The current dashboard recognizes only the admin role. Simply changing roles.ts will not give another role access to /dashboard or automatically restrict which modules it can operate.
If your product does not need different permission levels, continue using admin for the dashboard and the same guard for new admin APIs. If staff do need different access levels, you must treat this as a complete authorization requirement: define capabilities, update server-side guards, restrict APIs, and verify every admin page. Hiding frontend entry points alone is not a secure way to restrict access for different roles.
Extend the admin dashboard
After configuring administrators, add your product's management features to the existing /dashboard. You need to implement access controls for the dashboard, frontend, and APIs according to your business requirements.
Protect admin pages
For standalone server-rendered pages, follow src/pages/dashboard.tsx: run the access check first, then confirm administrator status with the administrator guard.
const guardResult = authenticatedGuard(c);

if (!guardResult.success) {
    return c.redirect(
        getFullPath(guardResult.details?.redirectUrl as string, locale),
    );
}

if (!await authz.isAdmin(c)) {
    return c.redirect(getFullPath('/', locale));
}
For a complete example, see:
Protect admin APIs
Admin APIs use requireDashboardAdmin. Mounting it under /api/dashboard automatically protects all child routes:
dashboardApi.use('*', requireDashboardAdmin);Do not rely only on checking roles.includes('admin') in React components. The client-side role list controls display only and cannot serve as a security boundary.
Add admin pages
For new management features, follow the existing SPA rendering pattern:
- Add a page component in
src/components/client/Dashboard/pages/. - Add a route in
Dashboard/index.tsx. - Add a navigation item in
Dashboard/const.ts. - Put the corresponding API in
src/api/dashboard/so it automatically uses the administrator guard.
To view or adjust existing user, role, entitlement, or payment data, use the existing modules first instead of building another listing page. If you do need a new listing page, you must implement its access controls yourself.
Pre-launch checks
The dashboard is a privileged entry point. Before launch, you should confirm at least the following:
-
adminEmailsuses an address you can verify instead ofadmin@saavo.dev. - Administrators can open
/dashboardand see the expected modules. - Ordinary users visiting
/dashboardare redirected to the homepage. - Ordinary users calling
/api/dashboard/*receive 401 or 403. - New admin APIs are mounted under dashboard routes or explicitly use
requireDashboardAdmin. - If analytics is disabled, its dashboard menu no longer appears.
You should test separately with a new administrator account and an ordinary account. Do not rely only on local users that have existed throughout development.
Frequently asked questions
Next steps
Choose further reading based on what you need to build:
- Create an admin page → Admin pages
- See how users become administrators → Authentication and accounts
- Manually adjust roles or entitlements → Permissions and entitlements
- Handle tickets in the dashboard → Tickets and support
- View payment records → Payments and plans
For most products, completing this chapter only requires replacing the administrator email with your own.
Add product-specific management pages using the existing dashboard pattern.